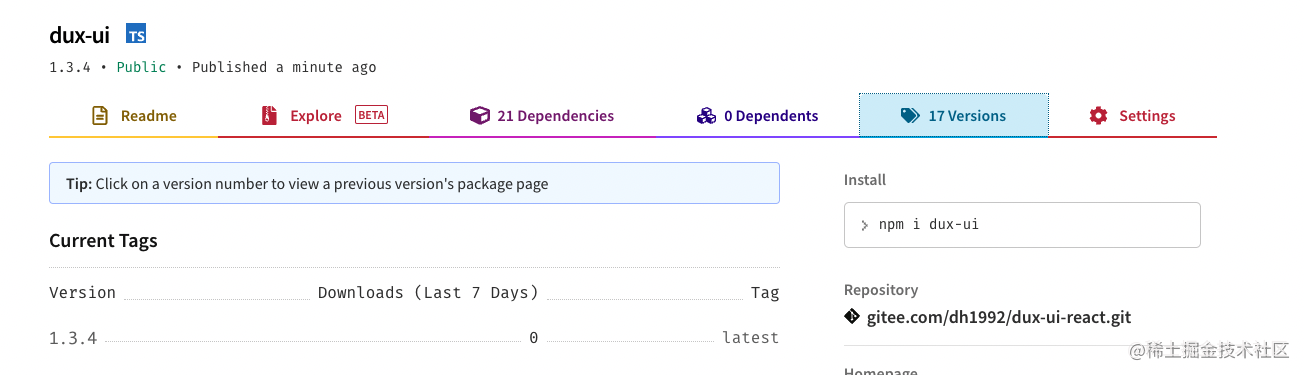
手把手搭建基于React的前端UI库 (六)-- 打包与发布NPM
1. 前言
经过前几篇文章的讲述,我们的组件库已经初具规模:源码。现在我们讲述一下如何发布到npm上,并且配置一下gitee pages.
本文最终部署主页效果:UI库主页。
2. 使用Webpack打包静态文件
首先看一下我们项目的目录结构:
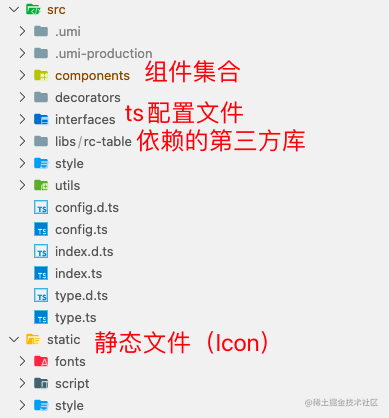
可以看到,本组件的静态文件比较少,仅仅在static中放置了Icon的字体样式文件,我们想把静态文件跟源码文件分开放置,方便以后迁移,同时也方便样式的按需引入。所以我们就先来打包static。
webpack.config.js
- 设置入口
entry: {
    // webpack只负责icon/css打包
    icon: path.resolve(__dirname, './static/style/icon.css'),
},
- 配置静态资源出口的路径
 output: {
    // 与icon相关的js放在scripts
    filename: 'scripts/[name].[contenthash].min.js',
    // 静态资源(字体样式文件)放在assets
    assetModuleFilename: 'assets/[contenthash][ext]',
    // 发布的包名
    library: 'dux-ui',
    // 使用umd模式,提高兼容性
    libraryTarget: 'umd',
    // 每次build时清空output目录
    clean: true,
 },
- 配置插件 - 压缩css
const cssPlugin = new MiniCssExtractPlugin({
  // css放在styles文件夹下
  filename: 'styles/[name].min.css',
});

...
plugins: [cssPlugin],
- 配置loader兼容css和字体文件(重要)
module: {
    rules: [
      {
        test: /static\/style\/icon\.css$/,
        use: [
          // 1. webpack5中, 使用MiniCssExtractPlugin.loader代替style-loader
          {
            loader: MiniCssExtractPlugin.loader,
          },
          'css-loader',
        ],
      },
      {
        // 2. webpack5 配置 - 识别字体文件
        test: /.(svg|eot|ttf|woff)$/,
        type: 'asset/resource',
      },
    ],
  },
- 配置打包的文件夹根路径为dist。新建一个 webpack.dist.config.js:
const path = require('path');

const config = require('./webpack.config');

config.output.path = path.resolve(__dirname, 'dist');
运行脚本:
NODE_ENV=production npm run build:webpack -- --config webpack.dist.config.js
查看项目路径上多出的文件:
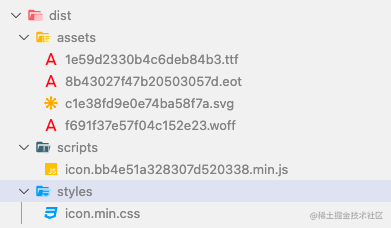
打包成功!
4. 使用Babel打包源文件
.babelrc.json
{
  // import/export 匹配为 script , 其他匹配为 module
  "sourceType": "unambiguous",
  "presets": [
    [
      // 预设,从后往前识别
      "@babel/preset-env",
      {
        "targets": {
          "ie": "11",
          "firefox": "29",
          "chrome": "30",
          "safari": "7"
        },
        "spec": true,
        "loose": true
      }
    ],
    ["@babel/preset-react"],
    // 识别ts
    ["@babel/preset-typescript", { "allowDeclareFields": true }]
  ],
  "plugins": [
    [
      // 自动移除语法转换后内联的辅助函数
      "@babel/plugin-transform-runtime",
      {
        "regenerator": false
      }
    ],
    ["@babel/plugin-transform-typescript", { "allowDeclareFields": true }],
    // 支持装饰器语法
    ["@babel/plugin-proposal-decorators", { "legacy": true }],
    // 编译类式组件,使用直接赋值方式
    ["@babel/plugin-proposal-class-properties", { "loose": true }],
    // 识别私有变量
    ["@babel/plugin-proposal-private-methods", { "loose": true }],
    "emotion",
    "lodash",
    ["babel-plugin-webpack-alias", { "config": "./webpack.config.js", "noOutputExtension": true }],
    // 从TypeScript生成React interface 或 别名
    ["babel-plugin-typescript-to-proptypes"]
  ]
}
package.json
配置包入口和文件:
"main": "lib/index.js",

...
"files": [
    "README.md",
    "index.d.ts",
    "dist/",
    "lib/"
],
运行脚本,打包所有src下的指定文件:
babel src/ --extensions '.js,.jsx,.ts,.tsx' -d lib/ --ignore '**/.umi/*','**/__tests__/*'
查看打包目录lib,已经有了结果:
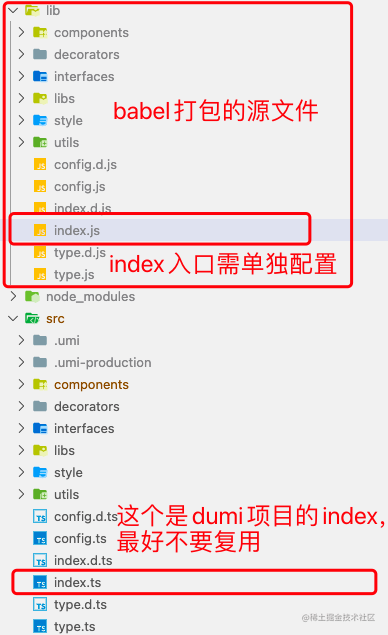
可以看到index是有问题的。他自动把src/index.ts打包进去了,这个index.ts是dumi文档自动生成的入口。而往往文档展示的组件与组件库实际拥有的组件数量是不一致的,有一些开发中的项目是不展示在文档中的;同时,如果调整了文档展示的组件,则会造成打包的组件有缺失的风险。所以还是决定单独在生成一次lib下的index.js。
build-index.js
写一个脚本生成index.js:
const fs = require('fs');
const path = require('path');
const child_process = require('child_process');

let js = '';

// 1. 读取所有想要从导出的组件(这里默认全部)
const result = fs
  .readdirSync('./src/components/', {
    withFileTypes: true,
  })
  .filter((dir) => /^[A-Z]+[a-zA-Z]*$/.test(typeof dir === 'string' ? dir : dir.name));

/** 2. 输出js格式
  * import * as InputAll from './components/Input/';
  *  const Input = Object.assign(InputAll.default, InputAll);
  *  export { Input };
 */
result.forEach((dir) => {
  if (typeof dir !== 'string') dir = dir.name;
  js += `
    import * as ${dir}All from './components/${dir}/';
    const ${dir} = Object.assign(${dir}All.default, ${dir}All);
    export { ${dir} };
    `;
});

// 3. 写入文件
fs.writeFileSync(path.join(__dirname, 'lib/__index.js'), js);

// 4. 使用babel再次打一下包
child_process.execSync('npx babel lib/__index.js --out-file lib/index.js');
执行脚本 node build-index即可。这样生成的lib文件夹下会多一个__index.js文件,但是无伤大雅,如果觉得不够清爽,可以加入以下删除代码:
fs.unlink('lib/__index.js', () => {});
如此,再次执行脚本:
babel src/ --extensions '.js,.jsx,.ts,.tsx' -d lib/ --ignore '**/.umi/*','**/__tests__/*' && node build-index.js
lib文件生成完毕~
5. npm发布
- NPM的使用,需要先注册账号,然后在项目根目录下执行
npm login:

按照图示输入顺序登录,就会看到Logged in字样,说明登入成功!
- 生成变更记录
-
项目中安装standard-version / cz-conventional-changelog:
yarn add --dev standard-version cz-conventional-changelog -
配置package.json中的脚本:
"commit": "cz" -
commit你的所有提交。
-
然后打版本(有patch/minor/major三种版本类型):
standard-version --release-as patch -
最后发布
npm publish
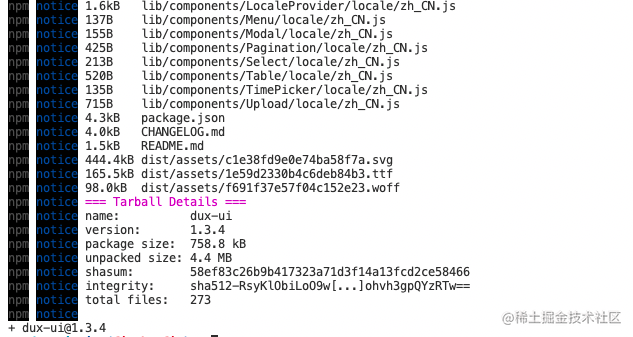
看到最新的版本号生成就表示发布成功了:
最后检查npm个人仓库主页是否有新的版本生成:
6. vite项目使用
我们可以在vite项目中测试一下我们发布的包能否使用。使用如下配置的依赖环境:
  "scripts": {
    "start": "vite",
    "build": "vite build",
    "preview": "vite preview"
  },
  "dependencies": {
    "dux-ui": "^1.3.4",
    "react": "^18.0.0",
    "react-dom": "^18.0.0"
  },
  "devDependencies": {
    "@types/react": "^18.0.0",
    "@types/react-dom": "^18.0.0",
    "@vitejs/plugin-react": "^1.3.0",
    "vite": "^2.9.9"
  }
执行yarn安装依赖。
在vite.config.js中配置引用路径:
import { defineConfig } from 'vite'
import react from '@vitejs/plugin-react'

export default defineConfig({
  plugins: [react()],
  alias: [
    { find: 'dux-ui/dist/styles/icon.min.css', replacement: '/node_modules/dux-ui/dist/styles/icon.min.css' },
    { find: 'dux-ui', replacement: '/node_modules/dux-ui/lib/index.js' },
  ],
})
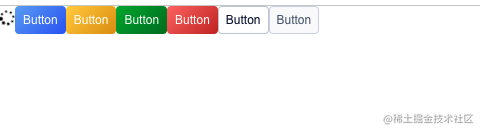
在App.jsx中测试组件:
...
<>
    <Icon type="loading" spin></Icon>
    {StyleTypes.map((type) => (
        <Button styleType={type} key={type} onClick={() => console.log('clicked')}>
          Button
        </Button>
    ))}
</>
启动项目后可以看到效果:
7. Dumi项目Gitee Pages配置
-
首先安装依赖:
yarn add --dev gh-pages -
执行脚本
dumi build -
然后输出到想要导出的文件夹(以docs-dist为例):
gh-pages -d docs-dist
运行成功后,会看到git仓库多一个分支:
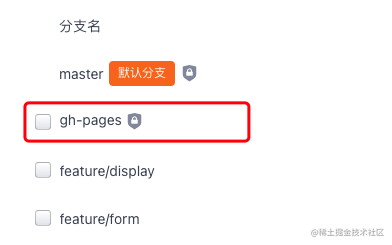
- 在gitee仓库页面,选择对应的服务:
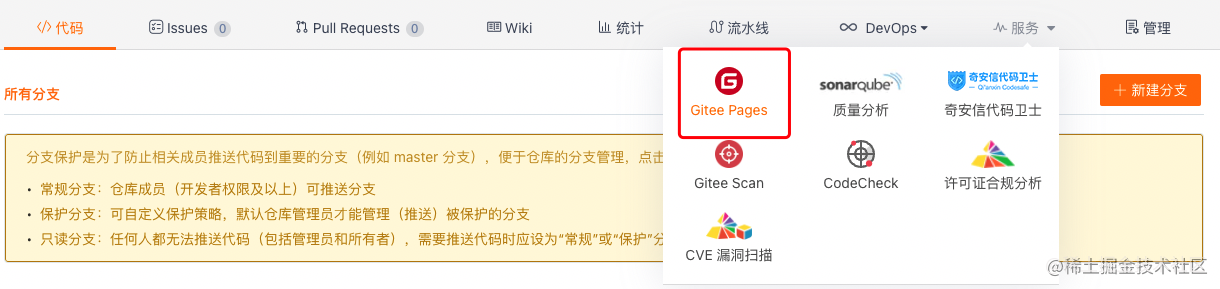
- 选择对应的分支,并且部署即可:

打开生成的链接即可看到部署的主页。如果打开后提示静态资源404,则需要进行如下配置:
.umirc.ts
  base: '/dux-ui-react/',
  publicPath: '/dux-ui-react/',
再次从第二步开始执行即可!
至此,基于React的UI库的搭建. 部署. 基础组件的封装已经结束。后续我会逐步完善组件库,添加更多常用的组件,敬请期待~~