React 源码解读
1. 虚拟 DOM
为什么使用虚拟 DOM(vdom)
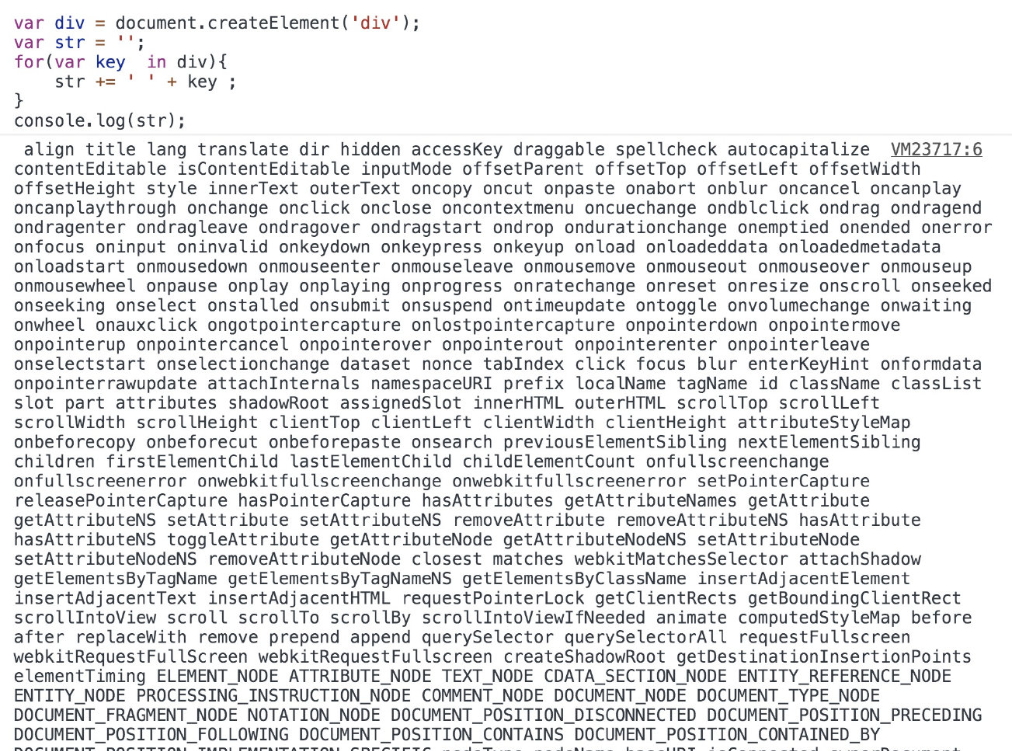
- DOM 操作很慢,轻微的操作都可能导致页面重新排版,非常耗性能。相对于 DOM 对象,js 对象处理起来更快,而且更简单。通过 diff 算法对比新旧 vdom(js 对象) 之间的差异,可以批量的、最小化的执行 dom 操作,从而提升用户体验
- DOM 内置属性太多,使用 vdom 可以只封装自己想要的属性来减少计算开销
react 渲染
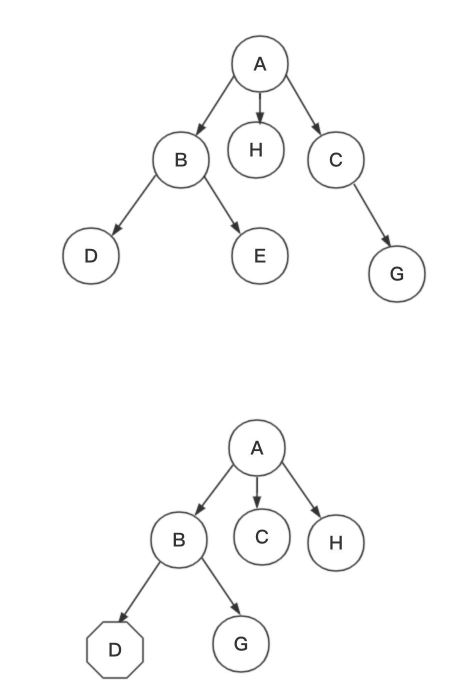
在某一时间节点调用 React 的 render() 方法,会创建一棵由 React 元素组成的树。在下一次 state 或 props 更新时,相同的 render() 方法会返回一棵不同的树。React 需要基于这两棵树之间的差别来判断如何有效率的更新 UI 以保证当前 UI 与最新的树保持同步。这种算法起个名字,叫做 DIFF 算法,字面意思,就是对比差异。
DIFF
react 渲染树:
算法策略
- 深度优先遍历
- 同级比较
- 拥有不同类型的两个组件将会生成不同的树形结构。
- 使用 key 来保持稳定渲染
diff 原则
- 删除:newVdom 不存在时
- 替换:vdom 和 newVdom 类型不同或 key 不同时
- 更新:有相同类型和 key 但 vdom 和 newVdom 不同时
2. Fiber 结构
为什么需要 fiber
一个新的更新渲染结构,更好的遍历渲染树,提高性能。
- diff 算法采用深度优先遍历(递归)的方式,对于大型项目,组件树会很大,这个时候递归遍历的成本就会很高,会造成主线程被持续占用,结果就是主线程上的布局、动画等周期性任务就无法立即得到处理,造成视觉上的卡顿,影响用户体验。
fiber 核心思想
- 增量渲染,空闲更新(把渲染任务拆分成块,匀到多帧),使用链表循环代替递归来进行深度优先遍历,算法时间复杂度 O(n)
- 更新时能够暂停,终止,复用渲染任务
- 给不同类型的更新赋予优先级
- 给新版 react 提供并发的基础能力
fiber 树(双向链表):
// 参考 jsx
<div>
  <article>
    <span></span>
  </article>
  <p>
    <strong></strong>
  </p>
  <a></a>
</div>
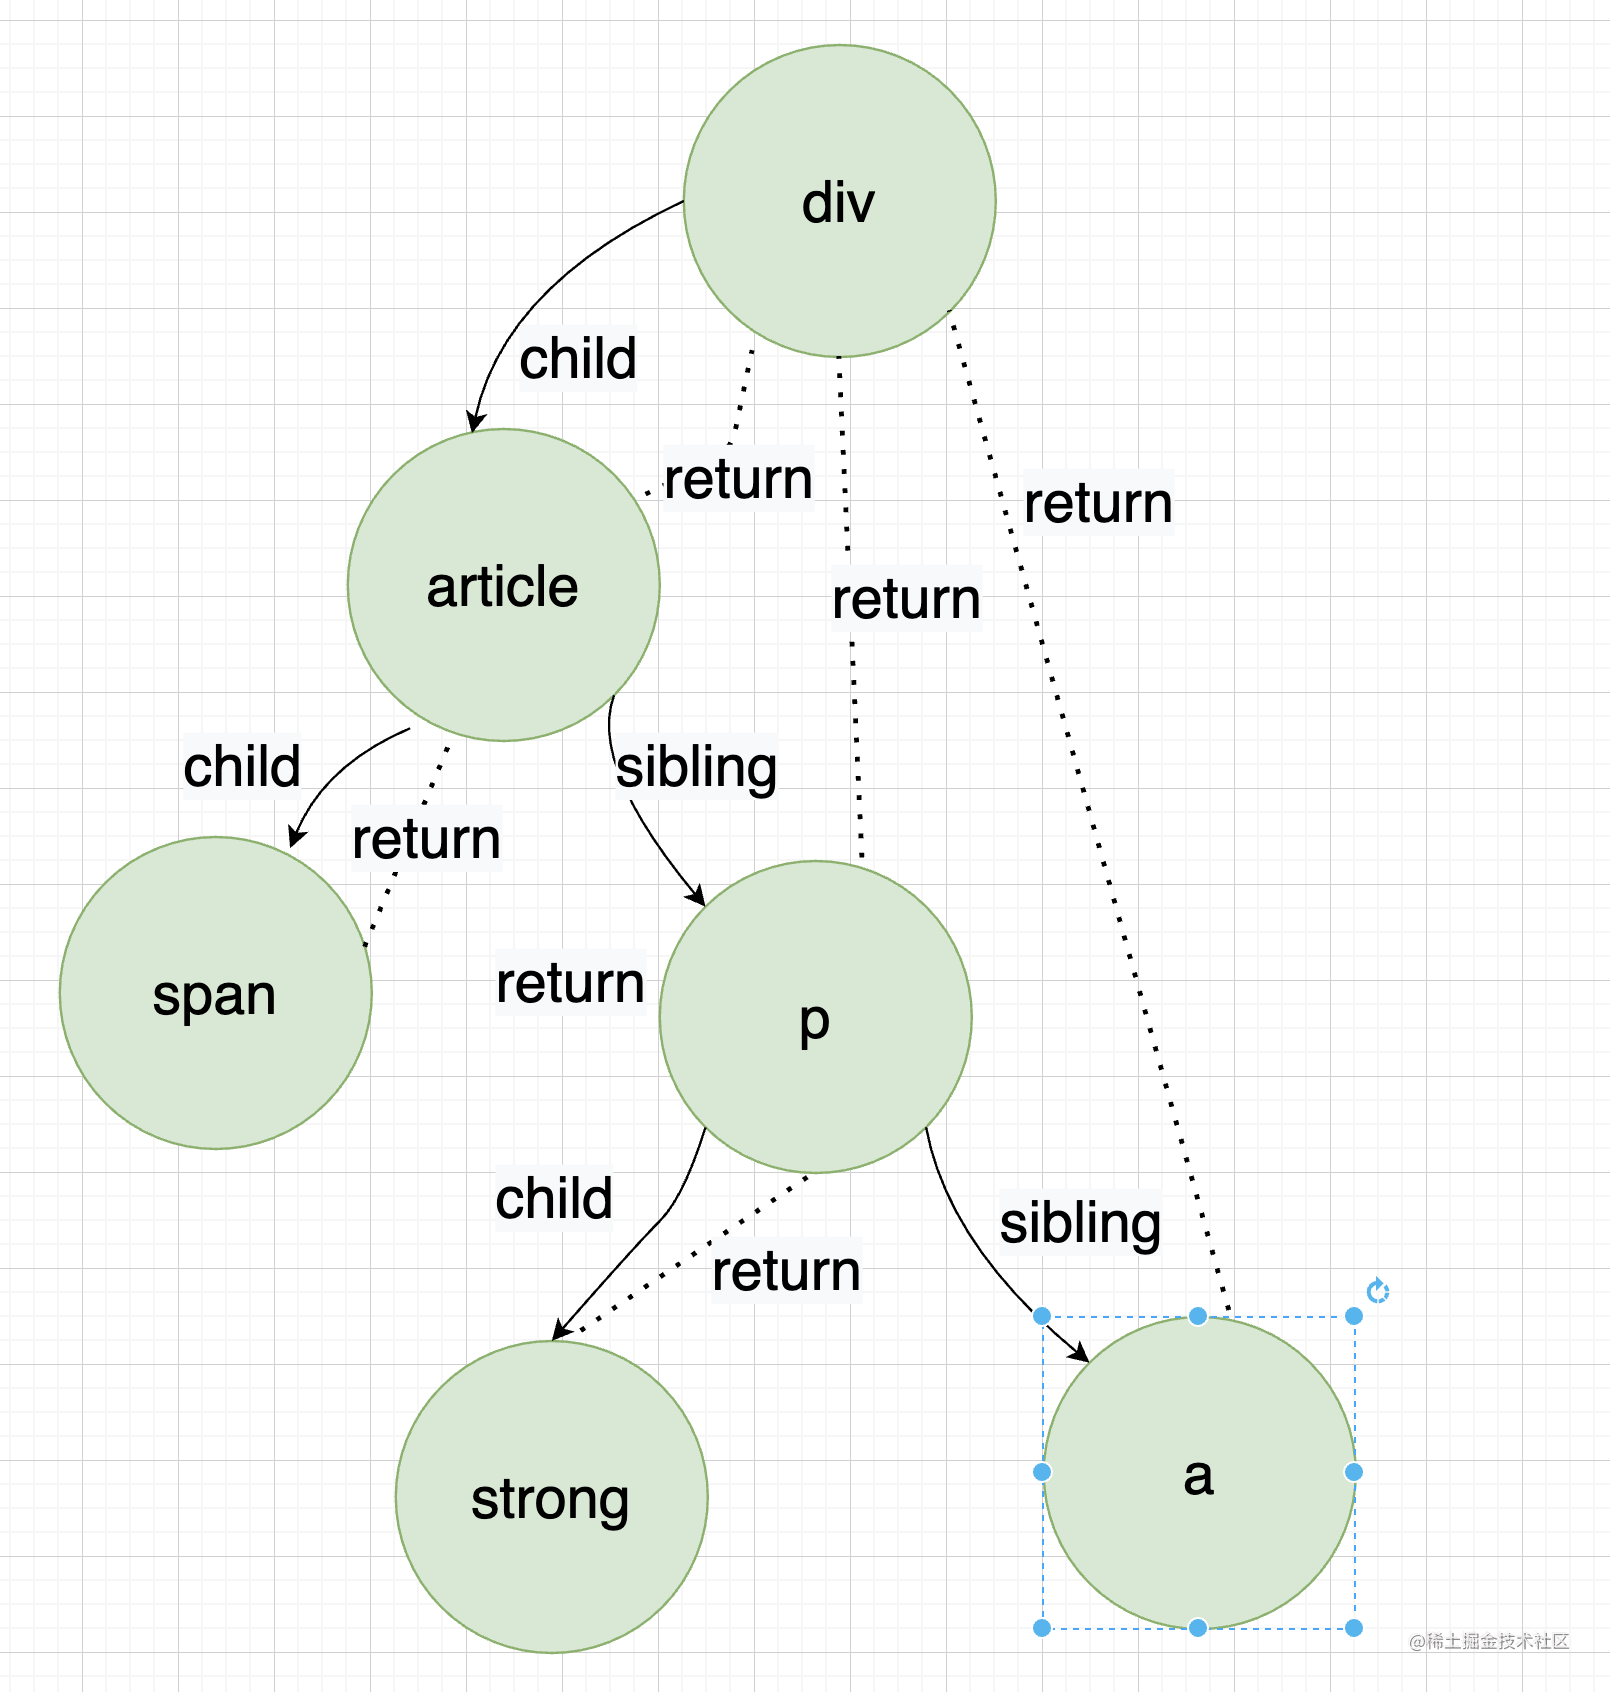
因为要借助 fiber,所以在 vdom 外需要包装一个 fiber node 的封装来参与调度。
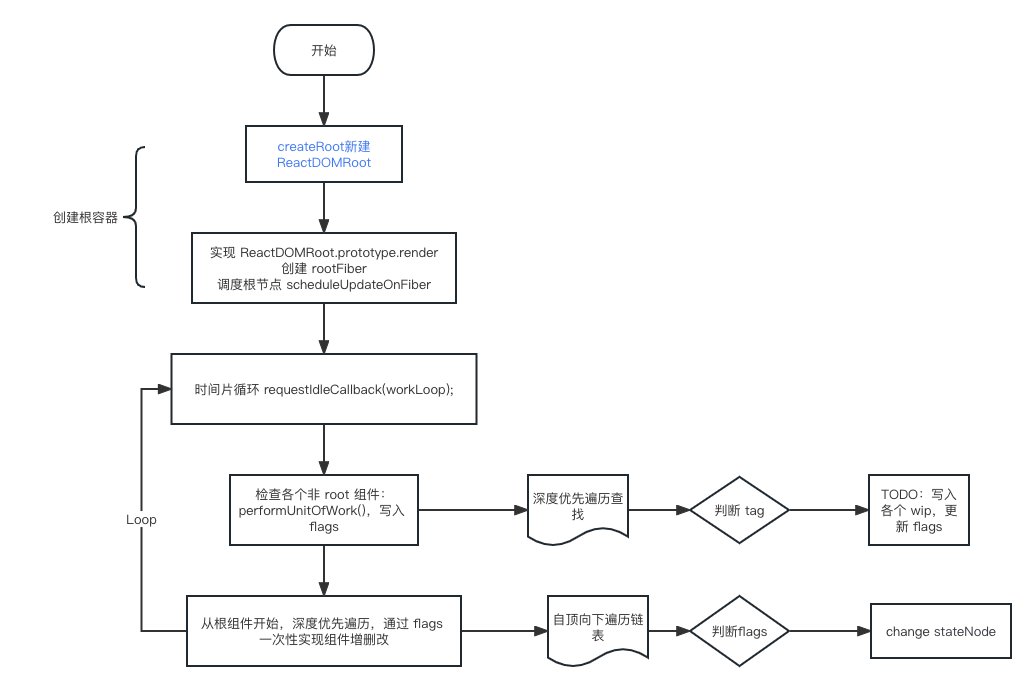
3. 实现一个 mini-fiber
〇 流程图
① Tags
由于要渲染不同的组件和原生标签,给各个类型打上标签:
// ReactWorkTags
export const FunctionComponent = 0;
export const ClassComponent = 1;
export const IndeterminateComponent = 2;
...
export const HostComponent = 5;
export const HostText = 6;
export const Fragment = 7;
② Fiber 对象
新建一个 fiber 封装类
// ReactFiber
export function createFiber(vnode, returnFiber) {
  const fiber = {
    type: vnode.type, // 表示fiber的真实类型 这个和elementType大部分情况下是一样的 在使用了懒加载之类的功能时可能会不一样。 区别于 tag,type可以自定义,当是组件时 type可以是这个组件的构造函数,用户创建元素时使用
    key: vnode.key,
    props: vnode.props, // 属性
    // 第一个子节点fiber
    child: null,
    // 下一个兄弟fiber
    sibling: null,
    // 父fiber
    return: returnFiber,
    // dom或实例
    // 函数式组件为null,他的实例存在child里,这也是为什么render里只能有一个跟节点
    stateNode: null,
    // 节点下标
    index: null,
    // old fiber
    alternate: null,
    flags: Placement,
    tag: null,
  };

  const { type } = vnode;

  // 打 tag
  if (isStr(type)) {
    // 原生标签
    fiber.tag = HostComponent; // 传入的是dom.nodeName
  } else if (isFn(type)) {
    // 函数组件 类组件
    fiber.tag = type.prototype.isReactComponent
      ? ClassComponent
      : FunctionComponent;
  } else if (isUndefined(type)) {
    // 此时是纯文本或数字节点
    fiber.tag = HostText;
    fiber.props = { children: vnode };
  } else {
    fiber.tag = Fragment;
  }

  return fiber;
}
其中 flags 用于区分接下来进行什么操作:
export const Placement = /*                    */ 0b0000000000000000000010; // 2
export const Update = /*                       */ 0b0000000000000000000100; // 4
export const Deletion = /*                     */ 0b0000000000000000001000; // 8
知道为什么使用 二进制吗?考虑到即将进行的操作可能会有多个,为了提高可扩展性,使用二进制方便位运算,相加同样具有唯一性。判断:
state & Update === true
区分 函数式组件和类式组件,需要额外加标志。我们都知道 类式组件最终都会继承 Component 组件,我能就在这个上边做手脚:
export default function Component(props) {
  this.props = props;
}

// 类组件标记
Component.prototype.isReactComponent = {};
只要判断有没有 isReactComponent 就可以区分是否是函数式组件了。
如此就构建了一个对 react vdom 二次封装的 Fiber 对象。
③ 渲染容器
我们都知道,React 17+ 的根组件渲染方式:
// 新的渲染方式,开放出了 root 对象单例,方便重复render
const root = ReactDOM.createRoot(document.getElementById("root"));
root.render(jsx);

...
root.render(jsx1);
那不如就从这里入手,来看看 fiber 是怎么封装 dom 的。
function createRoot(container) {
  const root = {
    containerInfo: container,
  };

  return new ReactDOMRoot(root);
}

function ReactDOMRoot(internalRoot) {
  this._internalRoot = internalRoot;
}
createRoot 返回了一个新的 ReactDOMRoot 对象:
ReactDOMRoot.prototype.render = function (children) {
  const root = this._internalRoot;

  updateContainer(children, root);
};

function updateContainer(element, container) {
  const { containerInfo } = container;

  // 这里可以看到, react的容器根节点一定是原生的dom,不然不存在nodeName
  const rootFiber = createFiber(element, {
    type: containerInfo.nodeName.toLocaleLowerCase(),
    stateNode: containerInfo,
  });

  scheduleUpdateOnFiber(rootFiber);
}
这个对象实现了 root 的 render 方法,调用了 updateContainer 方法。而这个方法创建了一个 Fiber 对象,通过 scheduleUpdateOnFiber 加入调度器:
export function scheduleUpdateOnFiber(fiber) {
  // work in process
  wip = fiber;
  wipRoot = fiber;
}
work in process 表示当前正在处理的 fiber 节点。
我们看到了,初始化工作完成后,似乎没有渲染的操作,只是 new 了一堆对象。所以需要创建一个调度任务。
④ 调度器之一
浏览器有自己的调度工具:
这里我们暂且使用浏览器自带的空闲时间片调度工具。由于考虑到兼容性,React 自己实现了这个函数,放在 Scheduler 里,下边会讲到。
// TODO:react scheduler 部分原生实现了一套:浏览器事件循环空闲时间段内调用函数排队
requestIdleCallback(workLoop);
我们这里关注的重点还是在如何调度上:
function workLoop(IdleDeadLine) {
  // 可以自己定义优先级来核实执行什么事件,这里判断只要空闲就排队
  while (wip && IdleDeadLine.timeRemaining() > 0) {
    // 执行任务:使用新的 O(n) 算法
    performUnitOfWork();
  }

  // 确保调度器在运行
  requestIdleCallback(workLoop);

  // 如果所有的任务执行完毕,commit一下,就是说触发一次更新。从 root 开始刷新一遍渲染
  if (!wip && wipRoot) {
    commitRoot();
  }
}
上边的代码是一个循环调度,反复调用 requestIdleCallback,让 CPU 在空闲时间片调用我们自己定义的调度函数来渲染界面。当有空闲时间时,执行 performUnitOfWork,当没有工作中的 fiber 实例,说明是渲染根节点,此时不能复用上边的更新逻辑,因为节点都还没有呢,谈不上更新,此时需调用 commitRoot。
执行任务代码如下:
// performUnitOfWork
const { tag } = wip;

// 通过 tag 区分渲染模式
switch (tag) {
  case HostComponent:
    updateHostComponent(wip);
    break;

  case FunctionComponent:
    updateFunctionComponent(wip);
    break;

  case ClassComponent:
    updateClassComponent(wip);
    break;

  case Fragment:
    updateFragmentComponent(wip);
    break;

  case HostText:
    updateTextComponent(wip);
    break;

  default:
    break;
}

// 2. 更新wip 多叉树深度优先遍历
// 优先找孩子,没有孩子就找兄弟,没有兄弟找父级的兄弟,直到找到根节点。时间复杂度:O(n)
if (wip.child) {
  wip = wip.child;
  return;
}

let next = wip;

while (next) {
  if (next.sibling) {
    wip = next.sibling;
    return;
  }
  next = next.return;
}
wip = null;
commitRoot 代码如下:
// commitRoot
commitWorker(wipRoot);
// 防止被 多次执行
wipRoot = null;

// fiber 树创建的过程
function commitWorker(wip) {
  // 直到找不到 wip,退出
  if (!wip) {
    return;
  }
  // 自己
  const { stateNode, flags } = wip;
  // 父dom节点
  const parentNode = getParentNode(wip.return); //wip.return.stateNode;

  // 具体 flags 的设置,在 后边 diff 算法中实现

  // 即将创建的
  if (flags & Placement && stateNode) {
    parentNode.appendChild(stateNode);
  }

  // 即将更新的
  if (flags & Update && stateNode) {
    updateNode(stateNode, wip.alternate.props, wip.props);
  }

  // 即将删除的
  if (wip.deletions) {
    commitDeletions(wip.deletions, stateNode || parentNode);
  }

  // 2. 下一个孩子
  commitWorker(wip.child);
  // 3. 下一个兄弟
  commitWorker(wip.sibling);
}

function getParentNode(wip) {
  // 自定义组件没有实体,return里全是child,需往上找父组件
  let tem = wip;
  while (tem) {
    if (tem.stateNode) {
      return tem.stateNode;
    }
    tem = tem.return;
  }
}

// prev  {a: 1}
// next { b: 3}
export function updateNode(node, prevVal, nextVal) {
  Object.keys(nextVal).forEach((k) => {
    if (k === 'children') {
      // 有可能是文本,我们自己设置的文本节点 props.children
      if (isStringOrNumber(nextVal[k])) {
        node.textContent = nextVal[k] + '';
      }
    } else if (k.slice(0, 2) === 'on') {
      const eventName = k.slice(2).toLocaleLowerCase();
      node.addEventListener(eventName, nextVal[k]);
    } else {
      node[k] = nextVal[k];
    }
  });
}

function commitDeletions(deletions, parentNode) {
  for (let i = 0; i < deletions.length; i++) {
    parentNode.removeChild(getStateNode(deletions[i]));
  }
}

function getStateNode(fiber) {
  let tem = fiber;
  while (!tem.stateNode) {
    tem = tem.child;
  }

  return tem.stateNode;
}
⑤ 渲染节点
上边的 commit 操作我们看到了,是根据节点的 flags 和 stateNode 实例来更新的。在渲染的时候,需要写入这两份属性,
- 渲染原生节点:
createElement 创建元素,props 通过 updateNode 更新
export function updateHostComponent(wip) {
  // 初次加载,stateNode=null
  if (!wip.stateNode) {
    // type : dom.nodeName.toLowerCase()
    wip.stateNode = document.createElement(wip.type);
    // 最终都会归类到原生节点
    // 初始化在这里commit,之后的更新在commitWorker里commit
    updateNode(wip.stateNode, {}, wip.props);
  }

  // 协调子节点
  reconcileChildren(wip, wip.props.children);
}
- 渲染文本节点
export function updateTextComponent(wip) {
  // 还记得上边原生节点放在了 props.children 中
  wip.stateNode = document.createTextNode(wip.props.children);
}
- 渲染类式组件
export function updateClassComponent(wip) {
  const { type, props } = wip;

  // type 是类的构造器
  const instance = new type(props);
  const children = instance.render();

  reconcileChildren(wip, children);
}
- 渲染函数式组件
export function updateFunctionComponent(wip) {
  // 读取 hook 的操作之后讲hook原理时会提到
  // renderWithHooks(wip);
  const { type, props } = wip;

  const children = type(props);

  reconcileChildren(wip, children);
}
- 渲染 Fragment
export function updateFragmentComponent(wip) {
  reconcileChildren(wip, wip.props.children);
}
最后是调节子节点函数,这也是 diff 算法实现的地方,设置 flag 也在这里:
function reconcileChildren(wip, children) {
  if (isStringOrNumber(children)) {
    return;
  }

  // 原生 dom 只有一个 child,会是一个对象,这里统一放在数组里
  const newChildren = isArray(children) ? children : [children];

  // 记录上一个fiber
  let previousNewFiber = null;
  let oldFiber = wip.alternate?.child;
  for (let i = 0; i < newChildren.length; i++) {
    const newChild = newChildren[i];
    if (!newChild) {
      // 规避这样的写法: {null}
      continue;
    }
    const newFiber = createFiber(newChild, wip);

    const same = sameNode(newFiber, oldFiber);

    if (same) {
      // 标记:更新节点
      Object.assign(newFiber, {
        stateNode: oldFiber.stateNode,
        alternate: oldFiber,
        flags: Update,
      });
    }

    if (!same && oldFiber) {
      // 与新的不一样,标记:删除
      deleteChild(wip, oldFiber);
    }

    if (oldFiber) {
      oldFiber = oldFiber.sibling;
    }

    // createFiber 默认的 flags就是标识:Placement 新建
    if (i === 0) {
      // 子节点中的第一个,把链表构建起来
      wip.child = newFiber;
    } else {
      previousNewFiber.sibling = newFiber;
    }

    previousNewFiber = newFiber;
  }
}

function deleteChild(returnFiber, childToDelete) {
  const deletions = returnFiber.deletions;

  if (deletions) {
    returnFiber.deletions.push(childToDelete);
  } else {
    returnFiber.deletions = [childToDelete];
  }
}

function sameNode(a, b) {
  return a && b && a.type === b.type && a.key === b.key;
}
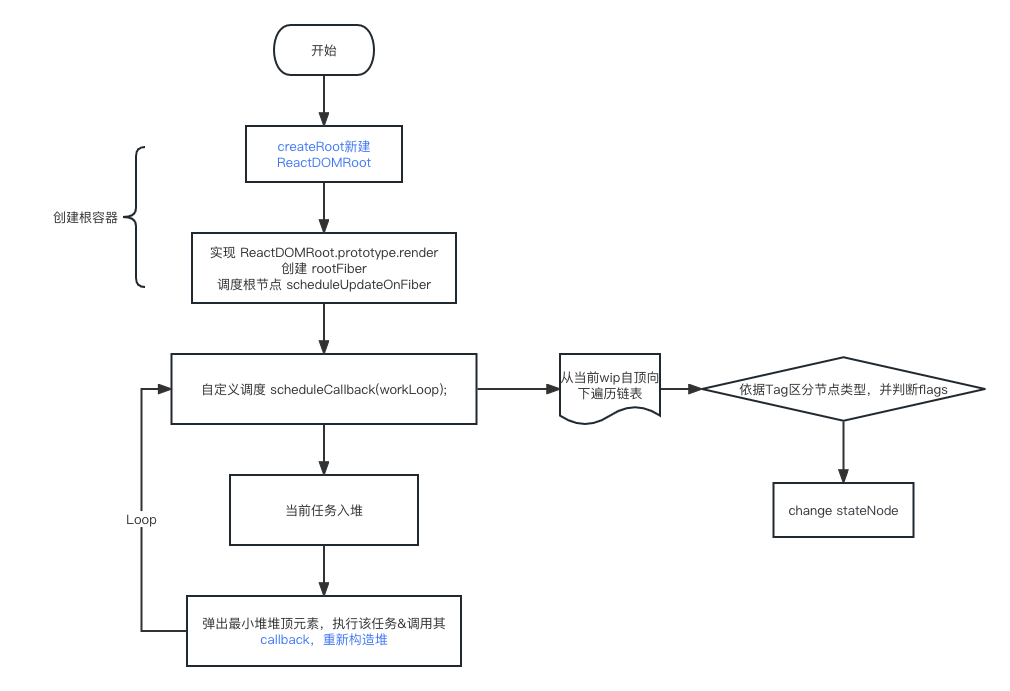
⑥ 调度器之二
讲自定义调度 CPU 空闲时间片之前,先回顾一下之前加入调度器的函数:
// root节点调用
export function scheduleUpdateOnFiber(fiber) {
  // work in process
  wip = fiber;
  wipRoot = fiber;

  // 新建一个自定义的调度
  scheduleCallback(workLoop);
}
上边为了不使用 js 自带的调度器 requestIdleCallback,react 这里自定义了调度的实现。我们来简易实现一下这个调度器:
(调度器实现开始)
// scheduler.js
// 牵扯到最小堆的算法,可以参考知识库中基础部分算法
import { push, pop, peek } from './minHeap';

// 任务队列
let taskQueue = [];
// 任务计数
let taskIdCounter = 1;

// 任务优先级 延迟时间
export function scheduleCallback(callback) {
  const currentTime = getCurrentTime();

  const timeout = -1; // 源码中还会有 priorityLevel 作为一个权重维度
  const expirationTime = currentTime + timeout;

  // 每次调度,id自增,push进堆
  const newTask = {
    id: taskIdCounter++,
    callback, // 回调函数
    expirationTime, // 任务开始时间
    sortIndex: expirationTime, // 任务排序,取决于过期时间(这里简单的任务过期时间越近,优先级越高)
  };
  push(taskQueue, newTask);

  // 请求调度
  requestHostCallback();
}

// MessageChannel允许我们在不同的浏览上下文,比如window.open()打开的窗口或者iframe等之间建立通信管道,并通过两端的端口(port1和port2)发送消息。MessageChannel以DOM Event的形式发送消息,所以它属于异步的宏任务。
const channel = new MessageChannel();
const port = channel.port2;
channel.port1.onmessage = function () {
  handleWorkMessage();
};

function requestHostCallback() {
  port.postMessage(null);
}

function handleWorkMessage() {
  // 每次取出堆顶最小的
  let currentTask = peek(taskQueue);
  while (currentTask) {
    // 暂不考虑执行进度以及中断执行
    const callback = currentTask.callback;
    currentTask.callback = null;
    callback();
    // 删除任务
    pop(taskQueue);
    // 拿当前等待时间最小的任务
    currentTask = peek(taskQueue);
  }
}

function getCurrentTime() {
  // Date.now():返回的时间戳没有被限制在一毫秒的精确度内,小于 1ms 的测试不出来结果。
  // performance.now():返回的时间戳以双精度浮点数 double 的形式表示时间,精度最高可达微秒级。不受系统影响。Date.now() 约等于 performance.timing.navigationStart + performance.now()
  return performance.now();
}
(调度器实现结束)
此时调度器外边的 loop 函数就可以精简了:
function workLoop() {
  while (wip) {
    performUnitOfWork();
  }

  // 确保调度器在运行
  // requestIdleCallback(workLoop);

  if (!wip && wipRoot) {
    commitRoot();
  }
}
〇 改进的流程图
4. Hooks
写在前边:Hooks 严格来说也是 fiber 的一部分,也牵扯到 diff 和调度,单独拿出来是因为他确实是一个独立的概念,同时也避免上一个章节太过臃肿。
Hooks 本质就是处理函数式组件的状态的集合。状态,是 react vdom 中自定义的一个属性,我们在 fiber 化之后也应该有,这里加上:
export function createFiber(vnode, returnFiber) {
  const fiber = {
    ...
    memorizedState: null
  }
}
memorizedState 属性对于类式组件存放的是 state 对象,对于函数式组件比较麻烦,因为 hooks 是一个一个的,所以这里又用了链式存储,memorizedState 存放第一个 hooks 指针即可。
因为 hooks 是函数式组件特有的,所以只会在渲染函数式组件时使用:
export function updateFunctionComponent(wip) {
  // 这里调用
  renderWithHooks(wip);

  const { type, props } = wip;
  const children = type(props);
  reconcileChildren(wip, children);
}
我们新建一个 hooks.js 文件来同意处理 hook。
先处理 hooks 中的全局属性:
let currentlyRenderingFiber = null;
// 老hook, 在useEffect中使用
let currentHook = null;
// 当前工作中的hook,同wip一样,hooks也是一个链表,需要一个当前的指针位置标识
let workInProgressHook = null;

export function renderWithHooks(wip) {
  currentlyRenderingFiber = wip;
  currentlyRenderingFiber.memorizedState = null;
  workInProgressHook = null;
}
这里类比前面的 fiber 应该好理解,讲当前 wip 传入变量 currentlyRenderingFiber,并初始化。
接着写一个通用的方法来构造函数式组件中 hooks 的链表关系:
function updateWorkInProgressHook() {
  let hook;

  // 拿到当前 fiber 在 diff 中的 old fiber
  const current = currentlyRenderingFiber.alternate;

  if (current) {
    // 2.更新
    currentlyRenderingFiber.memorizedState = current.memorizedState;

    if (workInProgressHook) {
      // 当前 hook 指针的位置
      workInProgressHook = hook = workInProgressHook.next;
      currentHook = currentHook.next;
    } else {
      // 没有指针,就从 hook0 开始
      workInProgressHook = hook = currentlyRenderingFiber.memorizedState;
      currentHook = current.memorizedState;
    }
  } else {
    // currentHook 只有在 fiber 变更时才起作用,不然一直是 null
    currentHook = null;

    // 1.初次渲染
    hook = {
      memorizedState: null, // state
      next: null, // 下一个hook
    };

    if (workInProgressHook) {
      // 如果已经有hook,就找链表下一个,移动指针
      workInProgressHook = workInProgressHook.next = hook;
    } else {
      // 不然就初始化memorizedState
      workInProgressHook = currentlyRenderingFiber.memorizedState = hook;
    }
  }

  return hook;
}
到这里,一个简单的 Hooks 就初始化完成啦。接下来看看具体的 hooks 怎么用吧。
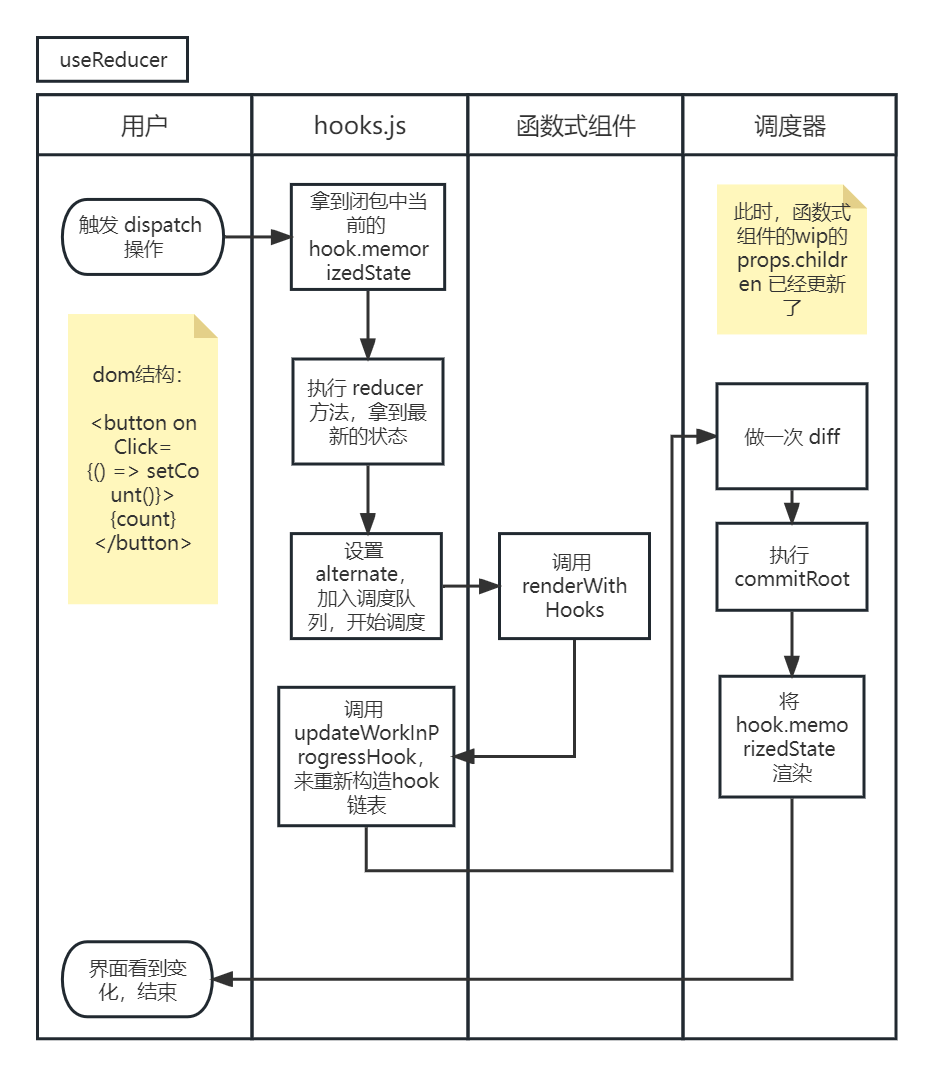
① useReducer
useReducer 是 useState 的替代品,使用的方式如下:
// 声明
const initialState = 1;
const reducer = (state: number, action: any | { type: string, value: any }) => {
  return state + 1;
};

const [count, dispatch] = useReducer(reducer, initialState);

// 调用
dispatch('add');
分析一下,useReducer 也是一个函数,接受一个处理函数 reducer 和一个初始值;同事返回一个当前的最新值和触发 reducer 的函数 dispatch,这个 dispatch 可以接受一个 action 参数,action 可以是一个字符串也可以是 一个对象:{ type, value }。
我们定义这个函数:
export function useReducer(reducer, initalState) {
  // 拿到当前的 workInProgressHook
  const hook = updateWorkInProgressHook();
  // 给初始值
  if (!currentlyRenderingFiber.alternate) {
    // 如果没有经过 diff 标记赋值 alternate,说明还没有初始化过 state。没有对比就不会存在 state 改变
    hook.memorizedState = initalState;
  }

  ...
}
接下来就是实现 将 reducer 转变为 dispatch 了。
我们声明一个转换函数:
function dispatchReducerAction(fiber, hook, reducer, action) {
  // hook.memorizedState = reducer ? reducer(hook.memorizedState) : action;
  if (reducer) {
    hook.memorizedState = reducer(hook.memorizedState, action);
  } else {
    // useState: setState(1);
    hook.memorizedState = action;
  }

  // 更新 alternate, fiber已经改变
  fiber.alternate = { ...fiber };
  // 兄弟节点置空,意思是只更新当前函数节点即可。这里不用担心链表断掉,reconcileChildren 中会重新构造链表关系。hook 更新只是据局部更新
  fiber.sibling = null;
  scheduleUpdateOnFiber(fiber);
}
由于 参数 fiber, hook, reducer 是我们内部处理的,只有 action 是外部传的,所以,我们在 useReducer 这里 bind 一下:
// useReducer 函数
...

// bind 到 null 上,是为了让 currentlyRenderingFiber 更新,直接调用 dispatchReducerAction,其指针指向没有变化,有多个函数式组件时,会产生渲染错乱。
// currentlyRenderingFiber 作为一个形参存进来,形成了一个闭包。如果有多个函数式组件都有hooks的话,他们的currentlyRenderingFiber是各自的fiber,不会造成指针混乱。
const dispatch = dispatchReducerAction.bind(
  null,
  currentlyRenderingFiber,
  hook,
  reducer
);

return [hook.memorizedState, dispatch];
② useState
useState 是 useReducer 的一个特殊形态,没有 reducer,每次只返回 action 里的值。
// reducer 为 null
export function useState(initialState) {
  return useReducer(null, initialState);
}
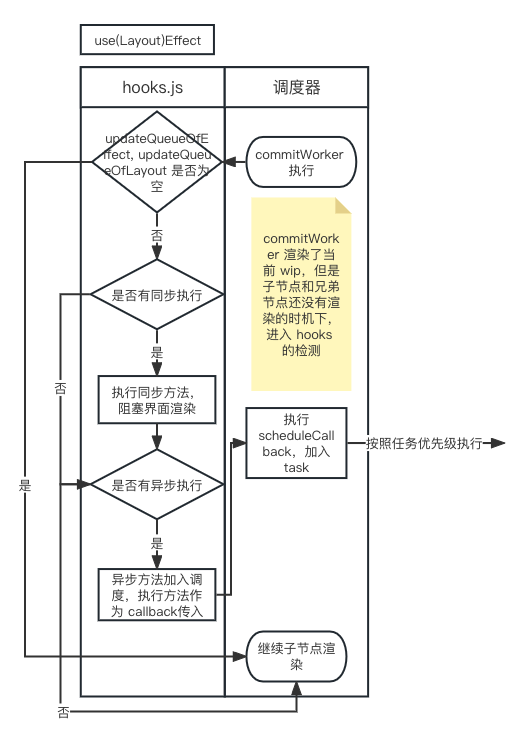
③ useEffect / useLayoutEffect
useEffect 在页面渲染完成后进入调度队列执行,是异步的。useLayoutEffect 则是同步执行副作用操作,也就是说,它会在浏览器渲染之前运行。
由于 useEffect 也可以有多个,所以,仍然是按照链表的方式存储的,这里为了便于大家理解,暂时用数组代替:
export function renderWithHooks(wip) {
  // old
  currentlyRenderingFiber = wip;
  currentlyRenderingFiber.memorizedState = null;
  workInProgressHook = null;

  // 为了方便,useEffect与useLayoutEffect区分开,并且以数组管理
  // 源码中是放一起的,并且是个链表
  currentlyRenderingFiber.updateQueueOfEffect = [];
  currentlyRenderingFiber.updateQueueOfLayout = [];
}
由于 useEffect 和 useLayoutEffect 都是在组件加载的某个时机执行一段方法。我们把公共的实现提取出来:
function updateEffectImp(hooksFlags, create, deps) {
  const hook = updateWorkInProgressHook();

  // 初始化时没有 currentHook,必然会走到下边执行函数,组件状态变更时,会赋值 currentHook,用于拦截是否要更新
  if (currentHook) {
    // 用于校验两次 依赖 是否有变化
    const prevEffect = currentHook.memorizedState;
    if (deps) {
      const prevDeps = prevEffect.deps;
      if (areHookInputsEqual(deps, prevDeps)) {
        return;
      }
    }
  }

  const effect = { hooksFlags, create, deps };

  hook.memorizedState = effect;

  // useEffect
  if (hooksFlags & HookPassive) {
    currentlyRenderingFiber.updateQueueOfEffect.push(effect);
    // useLayoutEffect
  } else if (hooksFlags & HookLayout) {
    currentlyRenderingFiber.updateQueueOfLayout.push(effect);
  }
}

// ! HookFlags
export const HookLayout = /*    */ 0b010;
export const HookPassive = /*   */ 0b100;

export function areHookInputsEqual(nextDeps, prevDeps) {
  if (prevDeps == null) {
    return false;
  }

  // 这里只是简单的按位置索引对比
  for (let i = 0; i < prevDeps.length && i < nextDeps.length; i++) {
    if (Object.is(nextDeps[i], prevDeps[i])) {
      continue;
    }
    return false;
  }

  return true;
}
最外层的调用可以这样写:
export function useEffect(create, deps) {
  return updateEffectImp(HookPassive, create, deps);
}

export function useLayoutEffect(create, deps) {
  return updateEffectImp(HookLayout, create, deps);
}
经过上面的函数后,组件内所有的 useEffect 就都收集在数组中了。接下来就是找个时机进度调度。分析一下,传递的函数需要在界面渲染前后调用,所以应该在 diff 之后,我们就把它加在 commit 函数中:
function commitWorker(wip) {
  // ...

  if (wip.tag === FunctionComponent) {
    invokeHooks(wip);
  }

  // 2. 提交子节点
  commitWorker(wip.child);
  // 3. 提交兄弟
  commitWorker(wip.sibling);
}
在当前节点变化更新完之后,还没有渲染子节点之前,检查一下是否有 useEffect 和 useLayoutEffect:
// 之前写的调度函数
import { scheduleCallback } from './scheduler';

// 核心调用代码示例
function invokeHooks(wip) {
  const { updateQueueOfEffect, updateQueueOfLayout } = wip;

  // 同步,阻塞了 commitWorker
  for (let i = 0; i < updateQueueOfLayout.length; i++) {
    const effect = updateQueueOfLayout[i];
    // 未处理其返回值
    effect.create();
  }

  // 加入调度,一般会在渲染结束后执行
  for (let i = 0; i < updateQueueOfEffect.length; i++) {
    const effect = updateQueueOfEffect[i];

    scheduleCallback(() => {
      effect.create();
    });
  }
}
思考:还记得 Effect 的函数有 return 么?在副作用消失时调用。这里,effect.create() 的返回值就是那个 return 的函数,所以,这里也应该加入调度队列,只是要控制调用时机,因为其只在组件被 delete 时调用。
〇 渲染流程图
接下来,我们抛开 fiber,简化一下源码逻辑,同时换一种思路来看 hook 本身,使用 preact 中的实现来讲解:
④ useMemo / useCallback
我们把 react 内置的 hook 都编上号,便于 devtool 解析,比如 useState 是 1,useCallback 是 8,useMemo 是 7 等等。于是有了下表:
| hook | 编号(currentHook) |
|---|---|
| useState | 1 |
| useReducer | 2 |
| useEffect | 3 |
| useLayoutEffect | 4 |
| useRef | 5 |
| useImperativeHandle | 6 |
| useMemo | 7 |
| useCallback | 8 |
| useContext | 9 |
| useErrorBoundary | 10 |
| useId | 11 |
我们可以通过 getHookState 方法获取到这个 hook 的状态:
function getHookState(index, type) {
  // 通过 type 记录 state 类型,便于 devTool 解析
  ...
  // 通过 index 获取当前 hook
  const hooks =
		currentComponent.__hooks ||
		(currentComponent.__hooks = {
			_list: [],
			_pendingEffects: []
		});

	if (index >= hooks._list.length) {
		hooks._list.push({ _pendingValue: EMPTY });
	}
	return hooks._list[index];
}
给当前的 vnode(currentComponent)设置__hooks属性,每一个 hook 呢,又有自己的_list来放置 hook 们的状态,以 useMemo 为例:
export interface MemoHookState {
  _value?: any;
  _pendingValue?: any;
  _args?: any[];
  _pendingArgs?: any[];
  _factory?: () => any;
}
同时每一个 hook 还有自己的 _pendingEffects:
export interface EffectHookState {
  _value?: Effect;
  _args?: any[];
  _pendingArgs?: any[];
  _cleanup?: Cleanup | void;
}
useMemo:
// hook按照递增顺序,会给一个currentIndex
// factory:用户传入的缓存函数
// args: 依赖数组
export function useMemo(factory, args) {
  /** @type {import('./internal').MemoHookState} */
  const state = getHookState(currentIndex++, 7);
  if (argsChanged(state._args, args)) {
    state._pendingValue = factory();
    state._pendingArgs = args;
    state._factory = factory;
    return state._pendingValue;
  }

  return state._value;
}

// 检测依赖更新
// 返回true的情况:没有old deps、依赖长度变化、新依赖中有不和原依赖一样的对象
function argsChanged(oldArgs, newArgs) {
  return (
    !oldArgs ||
    oldArgs.length !== newArgs.length ||
    newArgs.some((arg, index) => arg !== oldArgs[index])
  );
}
接下来看一下 useCallback:
// currentHook 就是用于 devtool 解析的变量,这里忽略
export function useCallback(callback, args) {
  currentHook = 8;
  return useMemo(() => callback, args);
}
⑤ useDebounce
接下来我们来引申一下第三方 hook 库ahooks中的一个防抖 hook。
使用:
import React, { useState } from 'react';
import { useDebounce } from 'ahooks';

export default () => {
  const [value, setValue] = useState<string>();
  const debouncedValue = useDebounce(value, { wait: 500 });

  return (
    <div>
      <input
        value={value}
        onChange={(e) => setValue(e.target.value)}
        placeholder="Typed value"
        style={{ width: 280 }}
      />
      <p style={{ marginTop: 16 }}>DebouncedValue: {debouncedValue}</p>
    </div>
  );
};
原理:
// 外层函数入参:func, wait, options(maxWait等参数)
// 内层函数
function debounced(...args) {
  const time = Date.now();
  const isInvoking = shouldInvoke(time);

  lastArgs = args;
  lastThis = this;
  lastInvokeTime = time;

  if (timerId) {
    cancelTimer();
  }

  if (isInvoking) {
    // 重启定时器函数 timerExpired
    timerId = startTimer(timerExpired, wait);
    return invokeFunc(lastInvokeTime);
  }

  return result;
}

function invokeFunc(time) {
  const args = lastArgs;
  const thisArg = lastThis;

  lastArgs = lastThis = undefined;
  lastInvokeTime = time;
  result = func.apply(thisArg, args);
  return result;
}
其中:
function shouldInvoke(time) {
  const timeSinceLastInvoke = time - lastInvokeTime; // 距离上一次调用的时间差

  return (
    lastInvokeTime === undefined ||
    timeSinceLastInvoke >= wait ||
    timeSinceLastInvoke < 0 ||
    (maxing && timeSinceLastInvoke >= maxWait)
  );
}

// 这些都是内部对象,兼容了js不同运行时环境的其那句对象
const root =
  freeGlobalThis || freeGlobal || freeSelf || Function('return this')();
const useRAF =
  !wait && wait !== 0 && typeof root.requestAnimationFrame === 'function';

function startTimer(pendingFunc, wait) {
  if (useRAF) {
    root.cancelAnimationFrame(timerId);
    return root.requestAnimationFrame(pendingFunc);
  }
  return setTimeout(pendingFunc, wait);
}
5. Diff 算法高级
这里讲解一下高阶版 diff 算法。
上边的 diff 算法(reconcileChildren)问题:
- 按位置对比,重复组件没办法复用,性能较低
因为大多数情况,页面的变化都是很小的,大部分 dom 树都是不变的,只有个别的变化,之前的算法中,如果对应位置上节点不一样就直接删掉,下边有需要这个节点了,只好再创建,成本高了不少。
算法思路:
- 创建一个 hash 表存放缓存节点
- 需要删除的节点删掉后存到 hash 表中
- 每需要新增一个位置的节点时,从 hash 表中读取
- 一轮 diff 做完之后,清空 hash 表
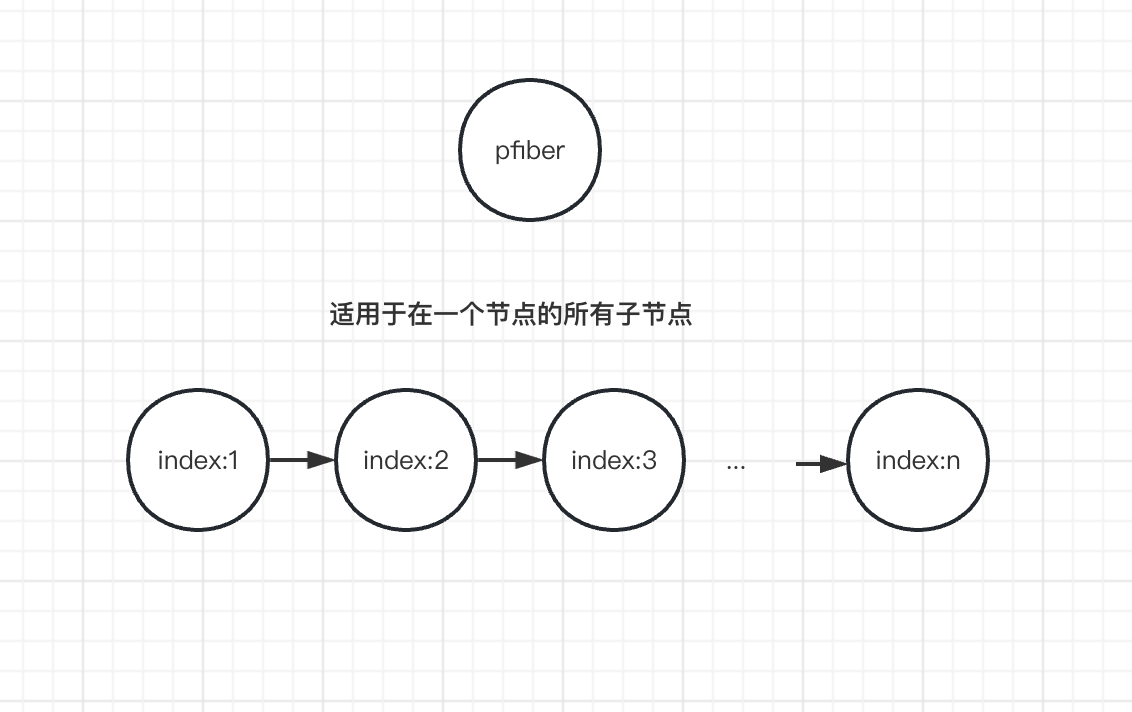
考虑到 fiber 的单链表结构,就不使用 vue 的双指针从前后同步查询,而是从左边往右遍历,比较新老节点,如果节点可以复用,继续往右,否则就停止。
流程图
渲染树(pfiber 就是 returnFiber):
第一步:从左往右遍历,查找直接能用的,直到遇到不能用的为止(下图中的数字代表该 fiber 的 index):
能复用的:
const same = sameNode(newChild, oldFiber);

if (same) {
  const newFiber = createFiber(newChild, returnFiber);

  Object.assign(newFiber, {
    stateNode: oldFiber.stateNode,
    alternate: oldFiber,
    flags: Update,
  });
}

// newIndex 指针后移
// lastPlacedIndex 指向最后放置的位置
停止条件:!sameNode(newChild, oldFiber)
第二步:如新节点没有了(newIndex === newChildren.length):

老节点往后的加入删除队列:
// 遍历随后的节点,加入父节点的 deletions
returnFiber.deletions.push(...)
第三步:如果老节点没有了:
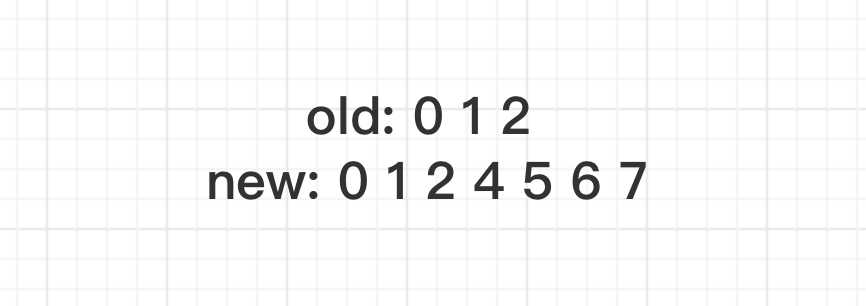
新的节点依次构建链表:
...
if (previousNewFiber == null) {
  returnFiber.child = newFiber;
} else {
  previousNewFiber.sibling = newFiber;
}
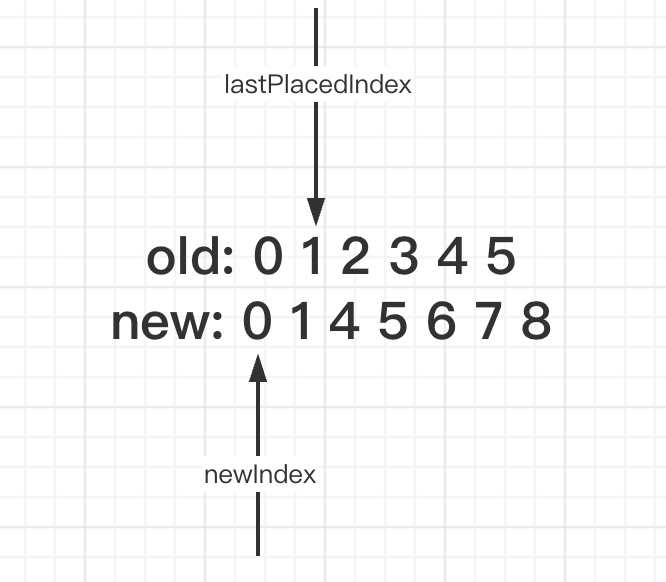
第四步:其他情况,使用 hash 表索引
// 举例1
// 0 1 [2 3 4 5 6]
// 0 1 [3 4 5 6 7 2]

// 举例2
// [0 1 2 3 4 5 6]
// [2 1 3 4 5]

// 把老节点加入Map
const existingChildren = mapRemainingChildren(oldFiber); // new Map()
// 遍历新节点,通过新节点的key去哈希表中查找节点,找到就复用节点,并且删除哈希表中对应的节点
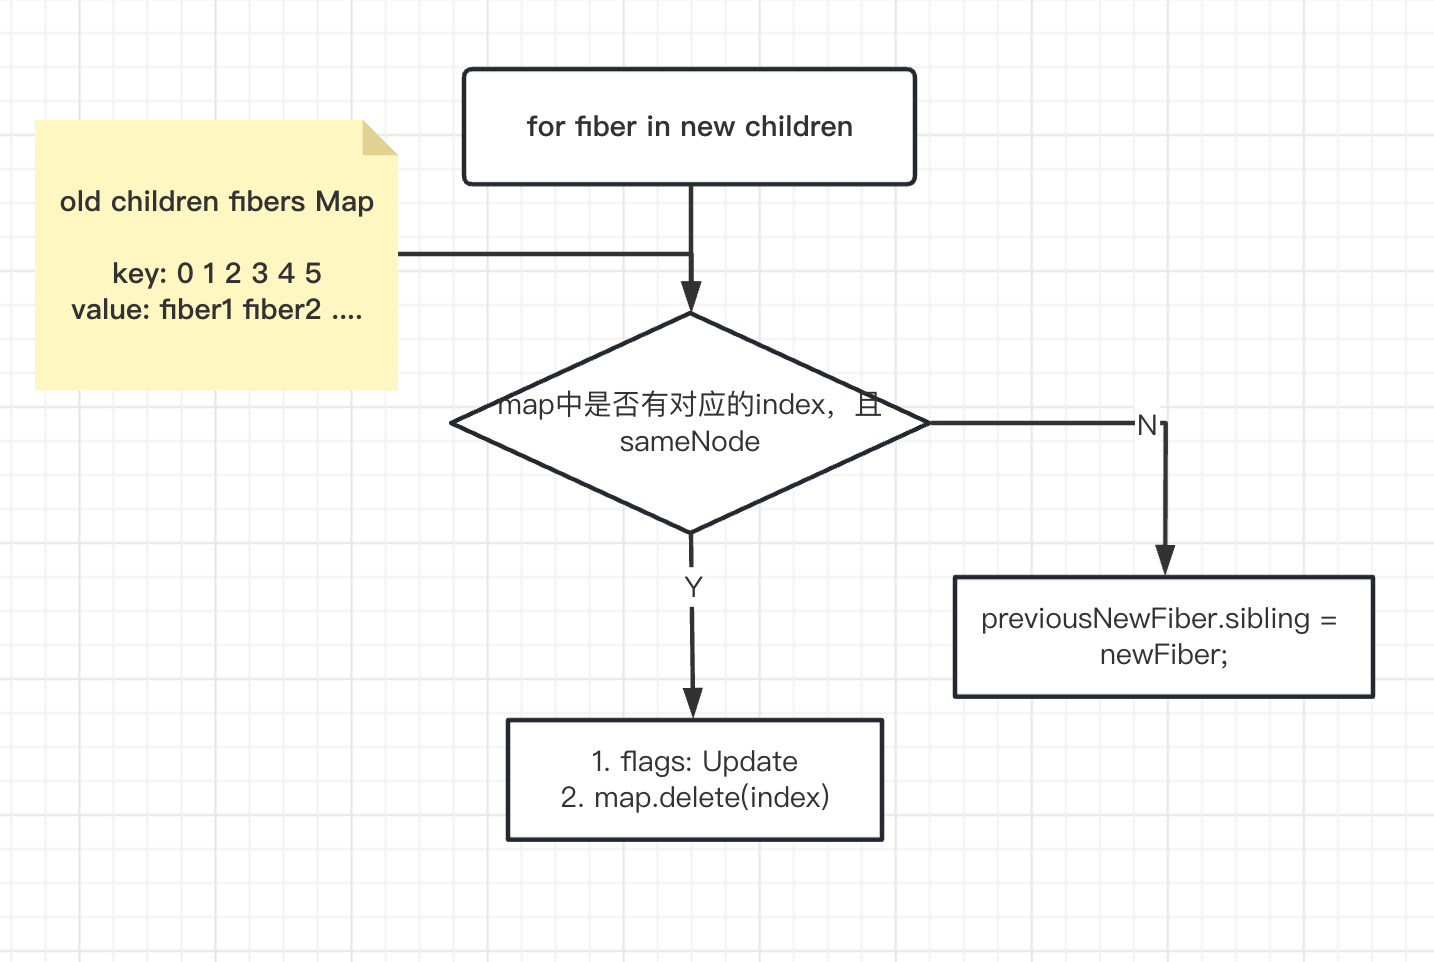
第五步:新节点遍历完后,若 hash 表中仍然有节点,则把这些节点加入 returnFiber.deletions;
示意代码
// oldfiber的头结点
let oldFiber = returnFiber.alternate?.child;
// 下一个oldFiber | 暂时缓存下一个oldFiber
let nextOldFiber = null;
// 用于判断是returnFiber初次渲染还是更新
let shouldTrackSideEffects = !!returnFiber.alternate;
let previousNewFiber = null;
let newIndex = 0;
// 上一次dom节点插入的最远位置
// old 0 1 2 3 4
// new 2 1 3 4
let lastPlacedIndex = 0;

// *1. 从左边往右遍历,比较新老节点,如果节点可以复用,继续往右,否则就停止
for (; oldFiber && newIndex < newChildren.length; newIndex++) {
  const newChild = newChildren[newIndex];
  if (newChild == null) {
    continue;
  }

  if (oldFiber.index > newIndex) {
    nextOldFiber = oldFiber;
    oldFiber = null;
  } else {
    nextOldFiber = oldFiber.sibling;
  }

  const same = sameNode(newChild, oldFiber);
  if (!same) {
    if (oldFiber == null) {
      oldFiber = nextOldFiber;
    }
    break;
  }
  const newFiber = createFiber(newChild, returnFiber);

  Object.assign(newFiber, {
    stateNode: oldFiber.stateNode,
    alternate: oldFiber,
    flags: Update,
  });

  // 节点更新
  lastPlacedIndex = placeChild(
    newFiber,
    lastPlacedIndex,
    newIndex,
    shouldTrackSideEffects,
  );

  if (previousNewFiber == null) {
    returnFiber.child = newFiber;
  } else {
    previousNewFiber.sibling = newFiber;
  }

  previousNewFiber = newFiber;
  oldFiber = nextOldFiber;
}

// *2. 新节点没了,老节点还有
// 0 1 2
// 0
if (newIndex === newChildren.length) {
  deleteRemainingChildren(returnFiber, oldFiber);
  return;
}

// *3. 初次渲染
// 1)初次渲染
// 2)老节点没了,新节点还有
if (!oldFiber) {
  for (; newIndex < newChildren.length; newIndex++) {
    const newChild = newChildren[newIndex];
    if (newChild == null) {
      continue;
    }
    const newFiber = createFiber(newChild, returnFiber);

    lastPlacedIndex = placeChild(
      newFiber,
      lastPlacedIndex,
      newIndex,
      shouldTrackSideEffects,
    );

    if (previousNewFiber === null) {
      // head node
      returnFiber.child = newFiber;
    } else {
      previousNewFiber.sibling = newFiber;
    }

    previousNewFiber = newFiber;
  }
}

// *4 新老节点都还有
// 小而乱
// old 0 1 [2 3 4]
// new 0 1 [3 4]
// !4.1 把剩下的old单链表构建哈希表
const existingChildren = mapRemainingChildren(oldFiber);

// !4.2 遍历新节点,通过新节点的key去哈希表中查找节点,找到就复用节点,并且删除哈希表中对应的节点
for (; newIndex < newChildren.length; newIndex++) {
  const newChild = newChildren[newIndex];
  if (newChild == null) {
    continue;
  }
  const newFiber = createFiber(newChild, returnFiber);

  // oldFiber
  const matchedFiber = existingChildren.get(newFiber.key || newFiber.index);
  if (matchedFiber) {
    // 节点复用
    Object.assign(newFiber, {
      stateNode: matchedFiber.stateNode,
      alternate: matchedFiber,
      flags: Update,
    });

    existingChildren.delete(newFiber.key || newFiber.index);
  }

  lastPlacedIndex = placeChild(
    newFiber,
    lastPlacedIndex,
    newIndex,
    shouldTrackSideEffects,
  );

  if (previousNewFiber == null) {
    returnFiber.child = newFiber;
  } else {
    previousNewFiber.sibling = newFiber;
  }
  previousNewFiber = newFiber;
}

// *5 old的哈希表中还有值,遍历哈希表删除所有old
if (shouldTrackSideEffects) {
  existingChildren.forEach((child) => deleteChild(returnFiber, child));
}
其中工具函数:
// 初次渲染,只是记录下标
// 更新,检查节点是否移动
function placeChild(
  newFiber,
  lastPlacedIndex,
  newIndex,
  shouldTrackSideEffects,
) {
  newFiber.index = newIndex;
  if (!shouldTrackSideEffects) {
    // 父节点初次渲染
    return lastPlacedIndex;
  }
  // 父节点更新
  // 子节点是初次渲染还是更新呢
  const current = newFiber.alternate;
  if (current) {
    const oldIndex = current.index;
    // 子节点是更新
    // lastPlacedIndex 记录了上次dom节点的相对更新节点的最远位置
    // old 0 1 2 3 4
    // new 2 1 3 4
    // 2 1(6) 3 4
    if (oldIndex < lastPlacedIndex) {
      // move
      newFiber.flags |= Placement;
      return lastPlacedIndex;
    } else {
      return oldIndex;
    }
  } else {
    // 子节点是初次渲染
    newFiber.flags |= Placement;
    return lastPlacedIndex;
  }
}

// hash表
function mapRemainingChildren(currentFirstChild) {
  const existingChildren = new Map();

  let existingChild = currentFirstChild;
  while (existingChild) {
    // key: value
    // key||index: fiber
    existingChildren.set(
      existingChild.key || existingChild.index,
      existingChild,
    );
    existingChild = existingChild.sibling;
  }

  return existingChildren;
}
在 commitWorker 里加入:
if (flags & Placement && stateNode) {
  // 1
  // 0 1 2 3 4
  // 2 1 3 4
  const before = getHostSibling(wip.sibling);
  insertOrAppendPlacementNode(stateNode, before, parentNode);
  // parentNode.appendChild(stateNode);
}

...
function getHostSibling(sibling) {
  while (sibling) {
    if (sibling.stateNode && !(sibling.flags & Placement)) {
      return sibling.stateNode;
    }
    sibling = sibling.sibling;
  }
  return null;
}
function insertOrAppendPlacementNode(stateNode, before, parentNode) {
  if (before) {
    parentNode.insertBefore(stateNode, before);
  } else {
    parentNode.appendChild(stateNode);
  }
}
/**
 * compact: true
 * inline: true
 */
import React from 'react';
import Giscus from '@giscus/react';
import { usePrefersColor } from 'dumi';

export default function Main() {
  const [color] = usePrefersColor();

  return (
    <section style={{ marginTop: '32px' }}>
      <Giscus
        id="comments"
        reactionsEnabled="1"
        emitMetadata="0"
        inputPosition="bottom"
        loading="lazy"
        src="https://giscus.app/client.js"
        repo="UMCloud-FE"
        repoId="R_kgDOIYRu5Q"
        category="Announcements"
        categoryId="DIC_kwDOIYRu5c4CU1sl"
        mapping="URL"
        strict="0"
        reactionsEnabled="1"
        emitMetadata="1"
        inputPosition="bottom"
        theme={color === 'dark' ? 'dark_tritanopia' : 'light_tritanopia'}
        lang="zh-CN"
        loading="lazy"
        crossorigin="anonymous"
        async={true}
        // theme={giscusTheme}
      />
    </section>
  );
}