MontoApp(五) - js 沙箱:Web Components 与 iframe隔离
本节开始,介绍微前端中 js 隔离的方案。
1. iframe沙箱原理
iframe 之所以支持 js 隔离,是因为在 V8 引擎里,每一个 iframe 都相当于开了一个新的 Isolate 对象,所以就相当于间接使用了 V8 隔离,他们是不同的 V8 上下文。
本文结合之前的 Web Components 加载方案和 iframe 天然沙箱,来实现一个隔离的方案。使用 iframe 的最主要的问题如下:
- 主子路由不统一
- 弹出层不会自动居中
- 数据状态同步问题
我们这里先解决第一个问题,将主应用的 history 对象代理一下传递给子应用:

仓库地址:sandbox/web-components-proxy 分支
我们实现的步骤如下:
- 改造子应用入口,声明自己的定制元素信息
- 主应用启动时,获取子应用信息
- 创建 iframe 元素
- iframe中子应用挂载时,将主应用的 window 代理后传递给子应用
- 子应用开始渲染,执行自己的 js,并挂载自己的定制化元素
- 子应用卸载时,设置 display 为 none 即可,js 不用删除
改造子应用
// 测试代码:全局变量的污染情况
this.a = 'a';
console.log('微应用1 a: ', a);

var b = 'b';
console.log('微应用1 b: ', window.b);

window.c = 'c';
console.log('微应用1 c: ', window.c);

let root = document.createElement("button");
root.textContent = "微应用 1 更改 history 为 micro1";
document.body.appendChild(root);

root.onclick = () => {
  // 这里来说明 history 用的是主应用来的代理
  history.pushState({}, '', '/micro1');
}
// end:测试代码

class MicroApp1Element extends HTMLElement {
  constructor() {
    super();
  }

  connectedCallback() {
    console.log(`[micro-app-1]:执行 connectedCallback 生命周期回调函数`);
    this.mount();
  }

  disconnectedCallback() {
    console.log(`[micro-app-1]:执行 disconnectedCallback 生命周期回调函数`);
    // 卸载处理
    this.unmount();
  }

  // [生命周期回调函数] 当 custom element 增加. 删除. 修改自身属性时,被调用
  attributeChangedCallback(attr, oldVal, newVal) {
    console.log(
      `[app:${this.name}]:执行 attributeChangedCallback 生命周期回调函数`
    );
    if (this[attr] !== newVal) {
      this[attr] = newVal;
      this.isConnected && this.mount();
    }
  }

  mount() {
    const $micro = document.createElement("h1");
    $micro.textContent = "微应用1";
    // 将微应用的内容挂载到当前自定义元素下
    this.appendChild($micro);
  }

  unmount() {}
}

window.customElements.define("micro-app-1", MicroApp1Element);
在子应用里定义了 Web Components 的元素声明,其操作的 document 等对象,都是相对于自己的 iframe 内部而言的。
主应用配置子应用列表信息
首先启动服务器:
<!-- 主应用导航 -->
<div id="nav"></div>

<!-- 主应用内容区 -->
<div id="container"></div>
app.use(express.static(path.join("public", "main")));
// ...
app.listen(port.main, host);
配置请求接口(子应用各自的node服务需要配置跨域,这里略去):
app.post("/microapps", function (req, res) {
  res.json([
    {
      name: "micro1",
      id: "micro1",
      // 自定义元素名称
      customElement: "micro-app-1",
      // 这里暂时以一个入口文件为示例
      script: `http://${host}:${port.micro}/micro1.js`,
      style: `http://${host}:${port.micro}/micro1.css`,
      prefetch: true,
    },
    {
      name: "micro2",
      id: "micro2",
      customElement: "micro-app-2",
      script: `http://${host}:${port.micro}/micro2.js`,
      style: `http://${host}:${port.micro}/micro2.css`,
      prefetch: true,
    },
  ]);
});
创建 iframe
我们声明一个 IframeSandbox 类:
// IframeSandbox
constructor(options) {
  this.options = options;
  // 创建 iframe 时浏览器会创建新的全局执行上下文,用于隔离主应用的全局执行上下文
  this.iframe = this.createIframe();
  this.iframeWindow = this.iframe.contentWindow;
  // 执行 history 代理
  this.proxyIframeWindow();
}
在子应用激活时可以这么写:
new IframeSandbox({
  rootElm: this.rootElm,  // 挂载应用的根节点,这里是 #container
  scriptText: this.scriptText,
  url: this.app.script,
  id: this.app.id,
  customElement: this.app.customElement
});
在 IframeSandbox 类里,我们开始构造一个局部的 js sandbox。
首先,使用 src = about:blank 的 iframe 可以保证其与主应用同源:
// IframeSandbox
createIframe() {
  const { rootElm, id, url } = this.options;
  const iframe = window.document.createElement("iframe");
  const attrs = {
    src: "about:blank",
    "app-id": id,
    "app-src": url,
    style: "border:none;width:100%;height:100%;",
  };
  Object.keys(attrs).forEach((name) => {
    iframe.setAttribute(name, attrs[name]);
  });
  rootElm?.appendChild(iframe);
  return iframe;
}
app-src 是一种安全策略,指定了只有子应用自己的 url 的资源可以被加载
做 history 代理
由于 history 是在 window 下的,document 也是在 window 下的,我们干脆直接代理主应用的 window 对象:
// IframeSandbox,在主应用中执行的
proxyIframeWindow() {
  this.iframeWindow.proxy = new Proxy(this.iframeWindow, {
    get: (target, prop) => {
      // 只是简单的代理,主子应用路由冲突没有解决
      // 思考:为了防止 URL 冲突问题,是否也可以形成设计规范,比如主应用采用 History 路由,子应用采用 Hash 路由,从而确保主子应用的路由不会产生冲突的问题
      if (prop === "history" || prop === "location" || prop === "document") {
        // 使用主应用 window
        return window[prop];
      }

      if (prop === "window" || prop === "self") {
        return this.iframeWindow.proxy;
      }

      // prop 是修正过的指向
      return this.getTargetValue(target, prop);
    },

    set: (target, prop, value) => {
      target[prop] = value;
      return true;
    },

    has: (target, prop) => !!target[prop],
  });
}
此时,原生的一些 API 会有问题,比如 window.alert 内部的 this 不是指向 iframe 的 window,而是指向被代理后的 proxy,因此在调用 alert 等原生函数会报错 Illegal invocation。 同类型的方法还有很多,比如 addEventListener. atob 等。
这里的 getTargetValue,用于重新将这些原生 native api 的 this 修正为 iframe 的 window。
我们来看一下实现:
getTargetValue(target, prop) {
  const value = target[prop];

  // 过滤出 window.alert. window.addEventListener 等 API
  if (
    typeof value === "function" &&
    !this.isBoundedFunction(value) &&  // 是直接定义的 function,不是 bind 的函数,因为 如果函数已经进行了 bind,那么不应该进行再次的绑定操作
    !this.isConstructable(value) // 过滤掉构造函数:例如原生的 Object. Array 以及用户自己创建的构造函数等。一些构造函数不需要进行 bind 操作,因为 bind 生成的函数会失去原有函数的属性和 prototype
  ) {
    console.log('修正 this: ', prop);

    // 修正 value 的 this 指向为 target
    const boundValue = Function.prototype.bind.call(value, target);
    // 重新恢复 value 在 bound 之前的属性和原型(bind 之后会丢失)
    for (const key in value) {
      boundValue[key] = value[key];
    }
    // 如果原来的函数存在 prototype 属性,而 bound 之后丢失了,那么重新设置回来
    if (
      value.hasOwnProperty("prototype") &&
      !boundValue.hasOwnProperty("prototype")
    ) {
      boundValue.prototype = value.prototye;
    }
    return boundValue;
  }
  return value;
}
其中两个判断函数如下:
isBoundedFunction(fn) {
  return (
    // 在ES6及之后的版本中,每个函数都有一个 name 属性, 如果函数是通过 function 关键字定义的,那么它的 name 属性值就是这个函数名。但如果函数是通过其他方式(例如使用 Function 构造函数或 Function.prototype.bind 方法)创建的,那么它的 name 属性值可能会被修改或添加前缀 (比如 bound)
    // 例子:
    /**
      let obj = {
        x: 10,
        getX: function() {
          return this.x;
        }
      };

      let getXBoundToObj = obj.getX.bind(obj);
      console.log(getXBoundToObj.name); // 输出 bound getX
    */

    // 被绑定的函数本身没有 prototype
    fn.name.indexOf("bound ") === 0 && !fn.hasOwnProperty("prototype")
  );
}

isConstructable(fn) {
  // 可以识别 Object. Array 等原生构造函数,也可以识别用户自己创建的构造函数
  return (
    fn.prototype &&
    // 通常情况下构造函数和类的 prototype.constructor 指向本身
    fn.prototype.constructor === fn &&
    // 通常情况下构造函数和类都会存在 prototype.constructor,因此长度大于等於 1
    // 需要注意普通函数中也会存在 prototype.constructor,
    // 因此如果 prototype上 有自定义属性或者方法,那么可以判定为类或者构造函数,因此这里的判断是大于 1
    // 自建函数,比如function Person {}; ,原型链上没有方法的 class 识别. function Person() {} 识别等,其长度 = 1
    // 注意不要使用 Object.keys 进行判断,Object.keys 无法获取 Object.defineProperty 定义的属性
    (Object.getOwnPropertyNames(fn.prototype).length > 1
      || (Object.getOwnPropertyNames(fn.prototype).length === 1 && Object.getOwnPropertyNames(fn.prototype)[0] === 'constructor'))
  );
  // TODO: 没有 constructor 的构造函数识别
  // 例如 Person.prototype = {}; 此时没有 prototype.constructor 属性
}
激活与失活函数
接下来在sandbox中定义一下激活子应用的函数:
// IframeSandbox
async active() {
  this.iframe.style.display = "block";
  // 如果已经通过 Script 加载并执行过 JS,则无需重新加载处理
  if (this.execScriptFlag) return;
  this.execScript();
  this.mount();
  this.execScriptFlag = true;
}
其中核心的执行代码和挂载函数如下:
execScript() {
  const scriptElement =
    this.iframeWindow.document.createElement("script");
  // 使用匿名执行是为了保证js作用域不会外泄,并且便于使用代理
  scriptElement.textContent = `
      (function(window) {
        with(window) {
          ${this.options.scriptText}
        }
      }).bind(window.proxy)(window.proxy);
      `;
  this.iframeWindow.document.head.appendChild(scriptElement);
}

mount() {
  if (!this.$webcomponent) {
    const $slot = this.iframeWindow.document.body;
    // 创建组件元素
    this.$webcomponent = this.iframeWindow.document.createElement(
      this.options.customElement
    );
    this.$webcomponent.setAttribute("micro-id", this.options.id);
    $slot.appendChild(this.$webcomponent);
  }
}
上面的函数中,with 语句用于将形参window的所有属性和方法添加到自己的作用域中,其设计的本意用于缩短查找作用域链。
失活比较简单:
inactive() {
  this.iframe.style.display = "none";
}
此外还有沙箱本身的销毁函数,这里也提一下:
// IframeSandbox 销毁沙箱
destroy() {
  this.options = null;
  this.exec = false;
  if (this.iframe) {
    this.iframe.parentNode?.removeChild(this.iframe);
  }
  this.iframe = null;
}
到这里,沙箱的设计基本完成!
接下来我们按照加载顺序,首先初始化主应用,获取微应用列表:
async init() {
  this.microApps = await this.fetchMicroApps();
  this.createNav();
  this.navClickListener();
  this.hashChangeListener();
  // 创建微前端管理实例
  this.microManager = new MicroManager(
    document.getElementById("container"),
    this.microApps
  );
}

// 从主应用服务器获请求微应用列表信息
async fetchMicroApps() {
  try {
    const res = await window.fetch("/microapps", {
      method: "post",
    });
    return await res.json();
  } catch (err) {
    console.error(err);
  }
}

...
// 创建 nav 导航的代码不是核心,略去
// hash 路由变化的监听事件
hashChangeListener() {
  // 监听 Hash 路由的变化,切换微应用(这里设定一个时刻只能切换一个微应用)
  window.addEventListener("hashchange", () => {
    this.microApps?.forEach(async ({ id }) => {
      id === window.location.hash.replace("#", "")
        ? this.microManager.activeApp(id)
        : this.microManager.inactiveApp(id);
    });
  });
}
上面代码提到一个 MicroManager 类,用于管理微前端应用的激活和销毁:
appsMap = new Map();

// 放入全部的微应用到一个map
setAppMaps(apps) {
  apps.forEach((app) => {
    this.appsMap.set(app.id, new MicroAppManager(this.rootElm, app));
  });
}

// 激活微应用
activeApp(id) {
  const current = this.appsMap.get(id);
  current && current.active();
}

// 失活微应用
inactiveApp(id) {
  const current = this.appsMap.get(id);
  current && current.inactive();
}
为了便于理解,上面又单独封装了一个 MicroAppManager 类,用于直接操作沙箱:
// 获取 JS 文本(微应用服务需要支持跨域请求)
async fetchScript(src) {
  try {
    const res = await window.fetch(src);
    return await res.text();
  } catch (err) {
    console.error(err);
  }
}

// 激活
async active() {
  // 缓存资源处理
  if (!this.scriptText) {
    this.scriptText = await this.fetchScript(this.app.script);
  }

  // 如果没有创建沙箱,则实时创建
  // 需要注意只给激活的微应用创建 iframe 沙箱,因为创建 iframe 会产生内存损耗
  if (!this.sandbox) {
    this.sandbox = new IframeSandbox({
      rootElm: this.rootElm,
      scriptText: this.scriptText,
      url: this.app.script,
      id: this.app.id,
      customElement: this.app.customElement
    });
  }

  this.sandbox.active();
}

// 失活
inactive() {
  this.sandbox?.inactive();
}
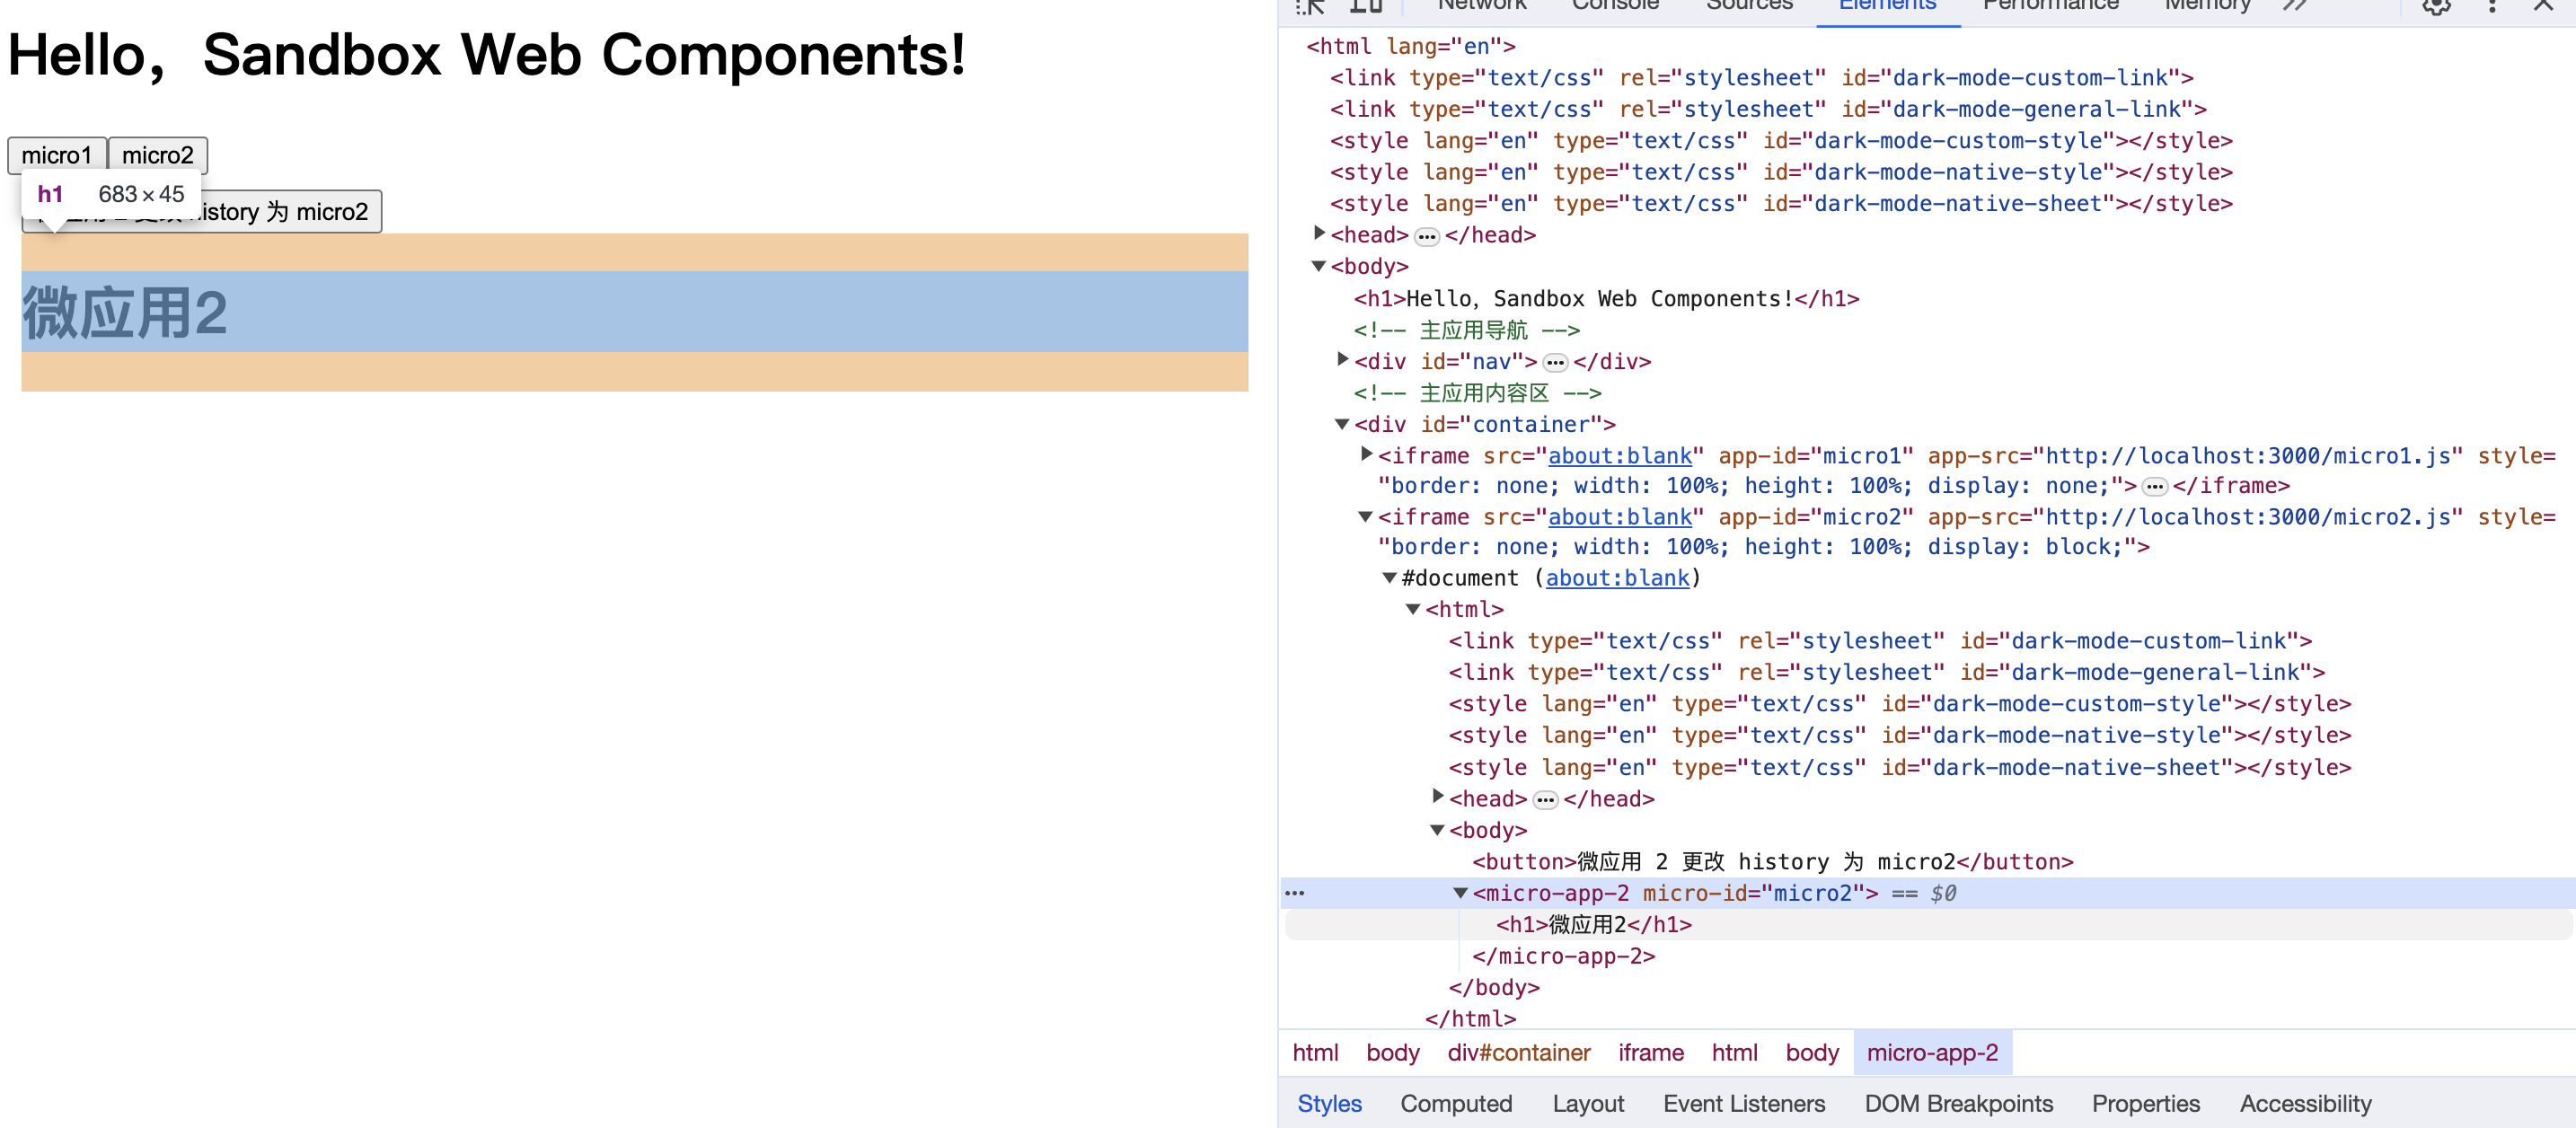
2. demo 测试